DXG-503 User’s Manual Preface Congratulations on your purchase of the DXG-503 digital camera. Please read this manual carefully and keep it in a safe place for future reference. About this manual Every effort has been made to ensure that the contents of this manual are correct and up to date. However, no guarantee is made regarding the accuracy of the contents, and DXG reserves the right to make changes without notice.
Prefacee Safety ‧ Inserting the batteries upside down can cause damage to the camera. ‧ Never attempt to recharge non-rechargeable batteries. ‧Do not use or store the product in dusty, dirty, or sandy areas, as the components may be damaged. ‧Do not store the product in hot areas. High temperatures can shorten the life of electronic devices, damage batteries and warp certain plastics. ‧Do not store the product in cold areas.
Table of Contents Preface About this manual ....................................................…....i Copyright ..................................................................…...i Safety ....................................................................……..ii Overview Camera Features ..................................................….......1 Unpacking ...........................................................…........2 About the camera ................................................…........
About the LEDs .......................................................….......17 Photo mode ............................................................….........19 Using photo mode..........................................…..............19 Flash........................................................................….....21 Macro...................................................................…........22 Zoom................................................................…............22 Menu options.....
Using playback mode ....................................................40 Menu options..................................................................40 Installing the software and drivers Drivers ...........................................................................45 Presto! Video Works 6 ...................................................46 Presto! Mr. Photo 3 ........................................................47 Appendix A Specifications ...................................................
1.1 Camera features The DXG-503 has many features including: ‧ Digital still camera (5.1 megapixels) ‧ Digital camcorder ‧ Mass storage device ‧ Voice recorder ‧ 3X optical zoom ‧ Direct Print functionality 1 6 System requirements 1.
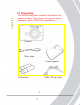
Unpacking 1.2 Unpacking All the following items should be included in the camera package. If any item is missing or appears damaged, contact DXG USA immediately.
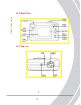
User manual 1.3 About the camera Refer to the following diagrams to familiarize yourself with the buttons and controls of the camera. 1.3.
About the camera 1.3.2 Back View 1.4.
This section covers only basic functions. See later chapters for details about advanced functions. 2.1 Installing the battery The camera requires two AA sized batteries. Insert the batteries as shown here. 1. Open the battery door. 2. Insert the batteries as shown. 5 10 Installing the battery 2.
Inserting an SD card 3. Close the battery door. Note: Be sure the batteries are installed properly. Batteries inserted upside down can damage the product 2.2 Inserting an SD card An optional SD/MMC card can be installed in the camera to provide additional storage space for still images, video, or other files. These cards are available for purchase at www.dxgusa.com To install an SD card: 1. Open the battery door. 2. Insert an SD card as shown. Make sure the gold contacts are facing up as shown.
2.3 Powering on the camera Press and hold the power button for two seconds. 2.4 Before you start Before you use your camera there are some basic settings you should adjust.. 2.4.1 Setting the date and time To set the date and time: 1. Use the mode dial to switch the camera to the Setup Mode. 7 12 Turning on for the first time 3. Close the battery door.
Before you start 2. Use the joystick to scroll through the options until DATE/TIME AD is highlighted. 3. Press the center joystick button to display the DATE/TIME submenu. 4. Use the joystick (left and right) to move through the year, month, date, hours, minutes, and format field. 5. Use the joystick (up and down) to change the selected field. 6. Press the center joystick button to complete the change. 2.4.2 Setting the beep function To set the beep function: 1.
4. Use the joystick (up and down) to select the Beep On or Beep Off . 5. Use the joystick (left and right) to adjust the volume slider as required. 6. Press the center joystick button to complete the change. 2.4.3 Setting the language To set the language: 1. Use the mode dial to switch the camera to Setup Mode. 2. Use the joystick to scroll through the options until LANGUAGE is highlighted. 3. Press the center joystick button to display the LANGUAGE submenu. 9 14 Before you start 3.
Changing modes 4. Use the joystick (left and right) to scroll through the available language options. 5. Press the center joystick button to complete the change. 2.5 Changing modes The DXG-503 can operate in five modes. Each mode is explained in the following table. Use the mode switch to change the mode. Icon Mode Photo Scene Movie Setup Playback Description For still pictures. The shutter speed and aperture are set by the camera. For still pictures. 15 preset scene programs to choose.
Before taking your first still picture, ensure you have read “Before you start” on page 7. To take a still picture: 1. Turn the camera on and make sure it is in Photo Mode. 2. Use the viewfinder or LCD screen to frame the picture. 3. Press the shutter button to capture the picture. The picture will automatically be saved with a unique file name. Taking your first still picture 2.6 Taking still pictures 2.7 Shooting video Before shooting your first video, ensure you have read “Before you start” on page 7.
Connecting to a TV or PC 2.8 Connecting to a TV or PC Read this section to learn how to connect the camera to a host computer and to a TV. 2.8.1 Connecting to a TV Connect the camera to a TV as shown.
Connect the camera to a host computer using the USB port as shown. 13 18 Connecting to a TV or PC 2.8.
Using the camera buttons 3. Using the camera Read this section to learn how to configure the camera and use the advanced features. 3.1 Using the camera buttons All buttons are located on the top and the back of the camera.
Button Name Display Joystick Function To switch between LCD display modes. Use to zoom in or out in Photo or Video modes. Use to increase or decrease image size in Playback mode. Press to display the main OSD menu. Use to navigate the OSD menus. Power Press to turn power on or off. Mode Use to select Photo, Scene, Video, Setup and Playback mode. Zoom Menu Shutter Press to capture a picture in Photo, or Scene mode; or start/stop video recording in Video mode.
Using the camera LCD display 3.2 Using the camera LCD display Use the LCD display to compose your pictures and videos, review pictures and videos stored in memory, and navigate the menu system. Icons are also displayed on the LCD display that show the current configuration. 3.2.1 Changing the LCD display You may decide that you don’t want to display icons on the LCD screen, or that you want the LCD screen turned off to save power. Use the Display button to cycle through the display modes.
Photo/SCN Back, Green Back, Red Front, Red Top, Green mode ● Power on - - - - Power off - - - ● Self timer - Flash ● - charging record/ busy - - ● Focusing - - ● Ready to ● - - ● shoot Error - ● - ● Picture - ● ● captured Playback Back, Green Back, Red Front, Red Mode(Photo) Power on Power off record/ busy Focusing Connecting Error Voice recording - - - - - - - ● - - - - - - ● ● - - 17 22 Top, Green ● - ● ● ● ● ● About the LEDs 3.
About the LEDs Photo/SCN Back, Green Back, Red Front, Red mode Power on - - - Power off - - - Self timer - Record/ - - busy Focusing - - Ready to ● - - shoot Error - ● - Picture ● - captured Top, Green Playback Back, Green Back, Red Front, Red Mode (Photo) Top, Green - - Power on Power off Record/ busy Focusing Connecting Error Other - - - - - - ● - 18 23 ● ● ● ● ● - - ● - - - ● ● ● - Legend: ●: LED on : :lashing LED -: LED off ● - - Back, Green Back, Red Front, Red Power saving ● -
3.4 Photo mode 3.4.1 Using Photo mode 1. Use the mode dial to switch the camera to Photo Mode. 2. Compose your picture using the viewfinder or LCD screen. 3. Press the shutter button to capture the shot. 3.4.2 Icons The following screen shows the program mode icons and their descriptions. 19 24 Photo mode Photo mode is the simplest mode to use when taking still pictures. In camera automatically selects the shutter speed and the aperture for you, but you can specify other settings.
Photo mode Icon 1 2 3 4 5 6 7 8 9 10 11 12 13 Name White Balance Photo Number Macro Self Timer Focus Date/ Time Battery Quality Resolution ISO Metering Mode Flash Description Indicates the current white balance setting Indicates how many pictures are stored in memory and the total number of photos that will fit in memory. Indicates macro mode is active. Indicates the self timer status. Icon is not displayed when the self timer is off. Indicates the current focus mode. Shows current date and time.
Flash Icon Description No flash, the flash never fires. Forced flash, the flash always fires. Auto flash, the flash fires only in low light conditions. Auto flash with red eye reduction, the flash fires in low light conditions and flashes briefly before the photo is taken to reduce the red eye effect. Force flash with red eye reduction, the flash always fires and flashes briefly before the photo is taken to reduce the red eye effect. Slow sync flash. Note: The flash cannot be used in video mode.
Photo mode 3.4.4 Macro When the macro function is enabled, the camera can focus on very close subjects. Press the joy-stick left to toggle the macro function on and off. A macro icon is displayed on the LCD screen to indicate when macro mode is enabled. Macro mode Note: The macro function works in photo, scene, and video modes. 3.4.5 Zoom The zoom function enables you to get up close to far away subjects, or move away from very close subjects.
Self timer. Use the self timer to add a delay between pressing the Shutter button and the picture being captured. To set the self timer option: 1. Press the menu button to display the menu. 2. Use the joystick (left and right) to highlight the SELF TIMER option and press the center joy-stick button to confirm. 3. Use the joystick (up and down) to highlight a self timer setting and press the center joystick button to confirm. The self timer can be set to 2 seconds,10 seconds, or Off. 4.
Photo mode 2. Use the joystick (left and right) to highlight the PIXEL option and press the center joystick button to confirm. 3. Use the joystick (up and down) to highlight a pixel setting and press the center joystick button to confirm. 4. Press the menu button to exit the menu. The new pixel setting will remain active until you change it. Quality The Quality option lets you change the compression of the photo file. The lower the compression, the higher the quality, and the larger the file.
To change the exposure compensation setting: 1. Press the menu button to display the menu. 2. Use the joystick (left and right) to highlight the EXP COMP option and press the center joystick button to confirm. Exposure compensation can be set to -2.0, -1.7, -1.3, -1.0, -0.7, -0.3, 0, 0.3, 0.7, 1.0, 1.3, 1.7, 2.0. 3. Use the joystick (up and down) to highlight a exp comp setting and press the center joystick button to confirm. 4. Press the menu button to exit the menu.
Photo mode 3. Use the joystick (up and down) to highlight a WB setting and press the center joystick button to confirm. 4. Press the menu button to exit the menu. The White Balance setting can be set to tungsten (incandescent), fluorescent, cloudy, sunny, or automatic. The WB setting will remain the same until you change it. ISO The ISO option lets you set the equivalent of a film speed in a conventional camera. You can also set the ISO value to A. When set to A, the ISO is set automatically.
1. Press the menu button to display the menu. 2. Use the joystick (left and right) to highlight the AF MODE option and press the center joystick button to confirm. 3. Use the joystick (up and down) to highlight an AF setting and press the center joystick button to confirm. 4. By pressing M mode, users can select focus area “up, down, center, right, left” 5. Press the menu button to exit the menu. Photo mode Auto Focus The AF (auto focus) option can be set to automatic and manual.
Photo mode Digital Zoom The digital zoom can be turned on or off. The digital zoom can be used to zoom in on a subject, but you may prefer to use only the optical zoom since the quality of the resulting picture will be higher. 1. Press the menu button to display the menu. 2. Use the joystick (left and right) to highlight the DZOOM option and press the center joystick button to confirm. 3. Use the joystick (up and down) to highlight the On or Off setting and press the center joystick button to confirm. 4.
Scene mode is very simple to use and includes a set of 15 preset programs to make picture taking easy. All the settings are made for you. 3.5.1 Using scene mode 1. Use the mode dial to switch the camera to SCN Mode. 2. Choose a preset program when prompted using the joystick (up and down). Press the center joystick button to confirm. 3. Compose your picture using the viewfinder or LCD screen. 4. Press the shutter button to capture the shot. 29 34 Scene mode 3.
3.5.2 Icons Scene mode The following screen shows the scene mode icons and their descriptions. Icon Name 1 White Balance 2 Photo number Macro Focus Date/ Time Battery Quality 3 4 5 6 7 Description Indicates the current white balance setting. Indicates how many pictures are stored in memory and the total number of photos that will fit in memory. Indicates macro mode is active. Indicates the current focus mode. Shows current date and time. Indicates current battery status.
8 9 10 11 12 Name Resolution ISO Metering Scene Flash Description Indicates current resolution setting. Indicates current ISO setting. Indicates the metering method. Indicates current scene. Indicates current flash setting. 3.5.3 Scenes There are 15 available preset scenes to choose from. Icon Name Fireworks Night portrait Night landscape Party Sport Description For capturing pictures of bright Subjects in dark environments. Ideal for fireworks. For capturing close subjects in dark environments.
Scene mode Icon Name Description Backlight For capturing images with strong backlight. Self To capture images of the Portrait photographer. Portrait For capturing close subjects in good lighting conditions. Macro For capturing close-up subjects in good light conditions. Beach For capturing images in bright sun-light with large reflective surfaces. Landscape For capturing distant subjects in good light conditions. Sunset For capturing sunsets or when shooting towards the light.
Video mode 3.5.5 Menu options The menu options in scene mode are limited because they are automatically set according to the scene selected. But you can change image size and quality settings, see “Pixel” on page 23 and “Quality” on page 24. To go back to scene selection: 1. Press the menu button to display the menu. 2. Use the joystick (left and right) to select the SCENE icon and press the joystick button down to confirm. 3.
Video mode 3.6.2 Icons The following screen shows the auto mode icons and their descriptions. Icon Name Description 1 White balance Indicates the current white balance set-ting. 2 Macro Indicates macro mode is on. 3 4 5 6 Focus Indicates the current focus mode. Date/ Shows current date and time. Time Battery Indicates current battery status. Resolution Indicates current resolution setting. 7 Mode Indicates current mode.
3.6.3 Menu options 3.7 Setup Use setup mode to set the camera configurations to suit your personal preferences. Turn the mode dial to SET Mode. 3.7.1 Date/time See “Setting the date and time” on page 7. 3.7.2 Insert date Use the insert date function to display the date on each still picture you capture. To set the insert date option: 1. Set the camera to the Setup mode using the mode dial. 2. Highlight the insert date option using the joystick (left and right). Press the joystick button down to confirm.
3.7.3 Format Use the format option to format the camera memory or memory card. Note: When you format the memory, all data will be deleted. Make sure you back up all your necessary files before you perform the format function. To use the format option: 1. Set the camera to set up mode using the mode dial. 2. Highlight the format option using the joystick (left and right). Press the joystick button down to confirm. 3. Use the joystick (up and down) to highlight the memory card or internal memory option.
3.7.5 Beep vol See “Setting the beep function” on page 8 3.7.6 Shutter vol Use the shutter volume option to set the sound level the shutter makes when a picture is taken. To set the shutter volume: 1. Set the camera to set up mode using the mode dial. 2. Highlight the shutter vol. icon using the joystick (left and right). Press the joystick button down to confirm. 37 42 Setup 1. Set the camera to set up mode using the mode dial. 2. Highlight the power saving icon using the joystick (left and right).
Setup 3. Use the joystick (up and down) to highlight the on or off option. 4. If the on option is highlighted, use the joystick (left and right) to set the volume level. 5. Press the joystick button down to confirm. 3.7.7 Language See “Setting the language” on page 9. 3.7.8 Reset Use the reset option to reset all settings to the factory default. To use the reset function: 1. Set the camera to set up mode using the mode dial. 2. Highlight the reset icon using the joystick (left and right).
The frequency option allows you to match the refresh rate of florescent lighting with the camera. In the United sates it should be set at 60Hz. In Europe, it should be 50Hz. To set the frequency: 1. Set the camera to setup mode using the mode dial. 2. Highlight the frequency icon using the joystick (left and right). Press the joystick button down to confirm. 3. Use the joystick (up and down) to highlight the 60Hz frequency option (USA). 4. Press the joystick button down to confirm. 3.7.
Playback mode 2. Highlight the TV out option using the joystick (left and right). Press the joystick button down to confirm. 3. Use the joystick (up and down) to highlight the NTSC option (for USA). 4. Press the joystick button down to confirm. 3.8 Playback mode Use playback mode to view the pictures and videos on the camera’s LCD screen. 3.8.1 Using playback mode 1. Use the mode dial to switch the camera to playback mode. 2.
1. et the camera in playback mode and find the picture to be protected on the screen. 2. Press the menu button to display the menu. 3. Use the joystick (left and right) to highlight the PROTECT option and press the joystick button in to confirm. 4. Use the joystick button (up and down) to select the SET or CANCEL option. Press the joystick button to confirm. 5. Press the menu button again to exit the menu. When the protect option is SET, the file cannot be deleted using the “Erase” or “Erase All” functions.
Playback mode 3. Use the joystick (left and right) to highlight the ERASE icon and press the joystick button in to confirm. 4. Use the joystick (up and down) to highlight the Execute or Cancel option. Press the joystick button in to confirm. The current picture or video will be deleted. You can use the joystick (left and right) to select the next picture or video to be deleted the same way. 5. Press the menu button to exit the menu.
1. Use the joystick up to select “Start” and down to ““Cancel” 2. Press the joystick button to stop auto play. Print Use the print function to set DPOF function. You can tag all pictures or just the current picture to be printed. You can also select how many copies to print and whether to include the date and time. DPOF requires a memory card. After all images to be printed are tagged, please remove the memory card and take it to a photographic store for printing or use it with a DPOF compatible printer.
Playback mode The print settings are applied to the current picture. You can then take your memory card to a photo shop and print the pictures per your own specifications. DPS DPS (Direct Print) is a standard that enables you to connect the camera directly to a printer using the USB interface. To use the DSP function, you must have a compatible printer. Using the DSP function you can print photos straight from the camera to a printer. To use the DPS function: 1. Press the menu button to display the menu.
Read this section to learn how to install the driver and software for the camera. 4.1 Drivers You will only need to install a driver for the camera if your operating system is Windows 98SE, or Windows ME. Windows 2000 and Windows XP are plug and play operating systems and do not require the driver to be installed. To load the driver: 1. Insert the supplied CD-ROM in the CD-ROM drive. 2. If the CD-ROM doesn’t automatically start, use Windows Explorer to execute the instngr.exe file in the root directory.
Presto! Video Works 6 3. Click the install button to install the driver. 4. Follow the on-screen instructions. 5. Connect the camera to the computer using the USB cable provided as described in “Connecting to a computer” on page 13. Note: When connecting the camera to a PC running Windows 2000 or Windows XP operating system, connect the camera as described in step 5 above, and the PC will install a driver automatically.
Presto! Video Works 6 The following screen will be displayed. 3. Click the install button to begin the installation process then follow the on-screen instructions. More information about Presto! Video Works 6 can be found in the help files when the application is started. 4.3 Presto! Mr. Photo 3 Presto! Mr. Photo 3 is an advanced photo editing software application. To install Presto! Mr. Photo 3: 1. Insert the supplied CD-ROM in the CD-ROM drive. 2.
Presto! Mr. Photo 3 The following screen will be displayed. 3. Click the install button to begin the installation process then follow the on-screen instructions. More information about Presto! Mr. Photo 3 can be found in the help files when the application is started.
Specifications Appendix A Specifications General Imaging sensor Active pixels Panasonic 5.3 megapixel CCD sensor 5.1 Megapixels Storage media Built-in 32 MB Flash memory SD/MMC card (32/64/128/256/512 MB) Sensor sensitivity Auto, ISO 100, 200, 400 equivalent, user definable Lens Kyocera 3X optical zoom lens Wide: F2.8~7.5, F=5.96mm Tele: F4.7~12.5, F=16.
General Flash White balance 2~6.6 feet Auto / Off / Auto+Red Eye Reduction / Forced Flash / Forced+Red Eye Reduction / Slow Sync. Auto/sunny/cloudy/tungsten/fluorescent EV compensation Self timer PC interface TV out format Shutter -2.0 EV ~ +2.0 EV (in 1/3EV step) 2 or 10 seconds USB 2.0, full speed NTSC/PAL Mechanical and electronic shutter 1/8 ~ 1/2000 second Auto power off Off, 1, 5, or 10 minutes (user definable) Power supply 2 x AA alkaline or rechargeable batteries Dimension 4.0” X 2.7” X 1.
Appendix B Number of images on SD Photos VGA 3MP 5MP 10MP Video 320x240 (20 fps) 32MB 128MB 256MB 512MB 1GB 172 16 10 39 688 106 51 160 1367 213 102 326 2752 426 204 656 5504 853 409 1339 4mins 13sec 8mins 36sec 62sec 17mins 34mins 16sec 31sec The number of pictures you can take varies depending on the complexity of the scene being photographed.
Appendix C System Requirements 1.1 System requirements The camera requires a host PC with the following specifications: ‧Windows® XP, 2000, ME, 98SE operating system ‧Intel® Pentium 166 MHz CPU or better ‧At least 32 MB of RAM ‧Standard USB 1.1 port or better ‧4 x speed CD-ROM drive or better ‧At least 10 MB of available disk space Note: A USB 1.1 port will enable you to transfer files to and from your host PC, but transfer speeds will be much faster with a USB 2.0 port.