
Manual
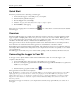
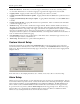
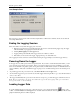
Table Of Contents
- Quick Start
- Overview
- Connecting the Logger to Your PC
- Setting Up the Logger To Record Data
- Custom Interval Setup
- Alarm Setup
- Using the Software to Check Logger Status
- Ending the Logging Session
- Powering Down the Logger
- Loading Logger Data
- Automatic Data Retrieval
- Working With the Data Graph
- Using the Zoom Feature
- Data Listing Window
- Data Summary and Statistics
- Using the Data Filter
- Hiding or Viewing Channels
- Exporting Logger Data
- Printing the Logger Data
- Calibrating the Logger
- Setting the Calibration Password
- Setting the Logger Real Time Clock
- Data Security
- Specifications
- MTL-30 Temperature Humidity Logger
- MTL-30 Logger Status LED
- Replacing the MTL-30 Battery
- MTL-30 Specifications
- MTL-20 Temperature Logger
- MTL-20 Logger Status LED
- Replacing the MTL-20 Battery
- MTL-20 Specifications
- GDL Temperature Humidity Logger with Display
- Turning the GDL On and Off
- GDL Sample Screen
- The GDL Summary Screen
- GDL Graph Screen
- GDL Buttons
- Replacing the GDL Battery
- GDL Specifications
- GDL-T Four Temperature Logger with Display
- Turning the GDL-T On and Off
- GDL-T Sample Screen
- GDL-T Difference Screen
- GDL-T Summary Screen
- GDL-T Graph Screen
- GDL-T Buttons
- Replacing the GDL-T Battery
- GDL-T Specifications
- MTL-LCD Loggers with Display
- MTL-LCD Display and Button
- Replacing the MTL-LCD Battery
- MTL-20-LCD Specifications
- MTL-30-LCD Specifications

DwyerLog User’s Guide Version 1.4x 8/33
o Idle, waiting for setup: The logger is not logging. It is waiting for a setup from the user. The logger's
real time clock is active in this mode.
o Logging will start on button press: Logging has been setup to start when the logger's Start button is
pressed.
o Logging will start at xxxx: Delayed logging. Logging has been selected to start at a future time. The
logger is waiting for this time to arrive to start logging.
o Logging in Progress: The logger is currently logging data.
o Logger ID: An ID that is unique for each logger. This ID can be used to ensure that the logged data has
not been tampered with. See the Data Security section for more details.
o Recording #: Indicates the number of times the logger has been setup to log. This counter can be used to
ensure that the logged data has not been tampered with. See the Data Security section for more details.
o Logger Time: Shows the date and time of the logger's real time clock.
o Battery Level: Shows the current level of the logger's battery. It is recommended that the battery is
replaced when this indicator reaches yellow. When this indicator reaches red, it is imperative that the
battery is replaced before logging becomes unpredictable.
• Logging Started At: Shows at what time the logging has started.
• Logging Duration: Shows how long the logging session has been active.
• Sample Rate shows how often the logger is recording the data.
• Data Rollover shows how many times the sample memory wrapped around after becoming full.
• Samples in Memory: Shows information on how many samples are currently stored in the logger memory, and
how much space remains free. Note that if rollover occurs, this value will always be 100%.
Alarm Status Pane
The Alarm Status pane displays the alarm thresholds for the active channels. If a high alarm occurred the threshold
is displayed in red. If a low alarm occurred, the threshold is displayed in blue.