
Manual

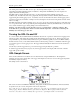
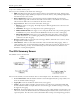
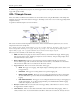
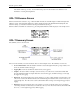
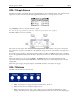
Table Of Contents
- Quick Start
- Overview
- Connecting the Logger to Your PC
- Setting Up the Logger To Record Data
- Custom Interval Setup
- Alarm Setup
- Using the Software to Check Logger Status
- Ending the Logging Session
- Powering Down the Logger
- Loading Logger Data
- Automatic Data Retrieval
- Working With the Data Graph
- Using the Zoom Feature
- Data Listing Window
- Data Summary and Statistics
- Using the Data Filter
- Hiding or Viewing Channels
- Exporting Logger Data
- Printing the Logger Data
- Calibrating the Logger
- Setting the Calibration Password
- Setting the Logger Real Time Clock
- Data Security
- Specifications
- MTL-30 Temperature Humidity Logger
- MTL-30 Logger Status LED
- Replacing the MTL-30 Battery
- MTL-30 Specifications
- MTL-20 Temperature Logger
- MTL-20 Logger Status LED
- Replacing the MTL-20 Battery
- MTL-20 Specifications
- GDL Temperature Humidity Logger with Display
- Turning the GDL On and Off
- GDL Sample Screen
- The GDL Summary Screen
- GDL Graph Screen
- GDL Buttons
- Replacing the GDL Battery
- GDL Specifications
- GDL-T Four Temperature Logger with Display
- Turning the GDL-T On and Off
- GDL-T Sample Screen
- GDL-T Difference Screen
- GDL-T Summary Screen
- GDL-T Graph Screen
- GDL-T Buttons
- Replacing the GDL-T Battery
- GDL-T Specifications
- MTL-LCD Loggers with Display
- MTL-LCD Display and Button
- Replacing the MTL-LCD Battery
- MTL-20-LCD Specifications
- MTL-30-LCD Specifications

DwyerLog User’s Guide Version 1.4x 26/33
Replacing the GDL Battery
The GDL uses three AA type alkaline or lithium batteries. Using rechargeable Ni-MH batteries is not
recommended. The battery level of the GDL is shown on the screen, or can be checked using the DwyerLog
software, by opening the Logger Status window. It is suggested that the battery is replaced when the battery level
reaches 1 bar on the display, or in the yellow zone in the DwyerLog software. When the battery indicator is empty,
or reaches red in the DwyerLog software, it is imperative that the battery is replaced as soon as possible. When the
battery level is too low, the logger will stop logging automatically, resulting in data not being recorded. The
DwyerLog software will give you a warning if you try to start a logging session while the battery is low.
To conserve battery power, the GDL will shutdown automatically, when not logging, after about one hour of
operation. To turn the logger back On, just press any button. The logger can run while logging continuously for one
year on a single set of three AA alkaline batteries.
To replace the batteries follow these steps:
1. Disconnect the logger from the USB cable. Do not replace the battery while the USB cable is connected!
2. Using a screwdriver, remove the 4 screws in the back of the logger.
3. Carefully remove the back case. Be very careful not to pull on the battery wires.
4. Remove the three used AA batteries.
5. Press and hold any logger button for about 2 seconds. This step removes any extraneous charge from the
logger system. This step is very important. The logger may not operate correctly if this step is not
performed.
6. Insert three new AA batteries into the battery holder. Make sure that the + indicator on the battery matches
the + indicator on the battery case.
7. When the batteries is replaced correctly, the logger should start up automatically and show the Sample
screen.
8. Replace the GDL back cover and replace the 4 screws.