
Manual
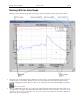
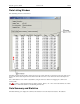
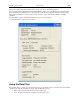
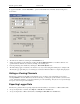
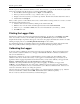
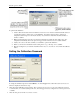
Table Of Contents
- Quick Start
- Overview
- Connecting the Logger to Your PC
- Setting Up the Logger To Record Data
- Custom Interval Setup
- Alarm Setup
- Using the Software to Check Logger Status
- Ending the Logging Session
- Powering Down the Logger
- Loading Logger Data
- Automatic Data Retrieval
- Working With the Data Graph
- Using the Zoom Feature
- Data Listing Window
- Data Summary and Statistics
- Using the Data Filter
- Hiding or Viewing Channels
- Exporting Logger Data
- Printing the Logger Data
- Calibrating the Logger
- Setting the Calibration Password
- Setting the Logger Real Time Clock
- Data Security
- Specifications
- MTL-30 Temperature Humidity Logger
- MTL-30 Logger Status LED
- Replacing the MTL-30 Battery
- MTL-30 Specifications
- MTL-20 Temperature Logger
- MTL-20 Logger Status LED
- Replacing the MTL-20 Battery
- MTL-20 Specifications
- GDL Temperature Humidity Logger with Display
- Turning the GDL On and Off
- GDL Sample Screen
- The GDL Summary Screen
- GDL Graph Screen
- GDL Buttons
- Replacing the GDL Battery
- GDL Specifications
- GDL-T Four Temperature Logger with Display
- Turning the GDL-T On and Off
- GDL-T Sample Screen
- GDL-T Difference Screen
- GDL-T Summary Screen
- GDL-T Graph Screen
- GDL-T Buttons
- Replacing the GDL-T Battery
- GDL-T Specifications
- MTL-LCD Loggers with Display
- MTL-LCD Display and Button
- Replacing the MTL-LCD Battery
- MTL-20-LCD Specifications
- MTL-30-LCD Specifications

DwyerLog User’s Guide Version 1.4x 16/33
The file exported to Microsoft Excel is an Excel .csv file. The easiest way to open this file in Excel is to just double
click on the created file. The file can also be opened from within Microsoft Excel:
1. From the Microsoft Excel application choose Open… from the File menu.
2. In the Open window, under Files of type:, select Text Files (*.prn, *.txt, *.csv).
3. Navigate to the directory where you saved the exported file. The file name should be listed in the window.
4. Select the file and click Open.
When you first open the .csv file in Excel, the Date Time column will be in a strange format. To convert to a normal
time and date format follow these steps:
1. Select the entire Date Time column by clicking on the column header (E).
2. While the cursor is in the column, click the right mouse button and select Format Cells.
3. Under Category: select Date or Time, then choose the format that suits you in the Type: column.
4. Click OK when done.
Printing the Logger Data
The DwyerLog software can print the data graph and data samples list. To print these, select Print from the File
menu. You can also view how your data will be printed using the Print Preview option from the File menu.
Graphs and data samples are printed as they appear on the screen. For graphs, this includes the current zoom detail,
marking of sample points, etc (see Working with the Data Graph for more detail).
For sample listing printout, any data filters applied to the data will be applied to the printed output as well. Data
filters are especially useful for reducing the amount of pages that the data sample printout generates.
Calibrating the Logger
Your logger is factory calibrated to an accuracy given in the logger specifications. However, there may be times
when you wish to adjust the calibration of your logger. NIST traceable calibration certificate is available at the
factory for an additional cost.
The DwyerLog software also provides you with the ability to perform a single point offset calibration. This
calibration can be used to increase the accuracy of your logger for a restricted data range. For instance, if your
application calls for logging temperature between 20°F and 32°F, you may want to calibrate your logger at 26°F.
Warning: Calibrating the logger erases the data that is stored in logger memory.
Calibration only can be performed when the logger is idle (not logging). To calibrate your logger, select
Calibrate… from the Logger menu. For extra security, calibration is password protected. You must enter the
correct password in the Calibration Password window before you’re allowed to calibrate the unit. The Password
Calibration window also allows you to change the password.
Once the password is entered correctly, a window asking you to select the channel to calibrate pops up. Select the
channel you would like to calibrate and click OK. Each channel must be calibrated separately.
The User Calibration window for the channel you selected will appear: