
Manual
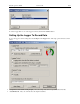
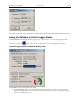
Table Of Contents
- Quick Start
- Overview
- Connecting the Logger to Your PC
- Setting Up the Logger To Record Data
- Custom Interval Setup
- Alarm Setup
- Using the Software to Check Logger Status
- Ending the Logging Session
- Powering Down the Logger
- Loading Logger Data
- Automatic Data Retrieval
- Working With the Data Graph
- Using the Zoom Feature
- Data Listing Window
- Data Summary and Statistics
- Using the Data Filter
- Hiding or Viewing Channels
- Exporting Logger Data
- Printing the Logger Data
- Calibrating the Logger
- Setting the Calibration Password
- Setting the Logger Real Time Clock
- Data Security
- Specifications
- MTL-30 Temperature Humidity Logger
- MTL-30 Logger Status LED
- Replacing the MTL-30 Battery
- MTL-30 Specifications
- MTL-20 Temperature Logger
- MTL-20 Logger Status LED
- Replacing the MTL-20 Battery
- MTL-20 Specifications
- GDL Temperature Humidity Logger with Display
- Turning the GDL On and Off
- GDL Sample Screen
- The GDL Summary Screen
- GDL Graph Screen
- GDL Buttons
- Replacing the GDL Battery
- GDL Specifications
- GDL-T Four Temperature Logger with Display
- Turning the GDL-T On and Off
- GDL-T Sample Screen
- GDL-T Difference Screen
- GDL-T Summary Screen
- GDL-T Graph Screen
- GDL-T Buttons
- Replacing the GDL-T Battery
- GDL-T Specifications
- MTL-LCD Loggers with Display
- MTL-LCD Display and Button
- Replacing the MTL-LCD Battery
- MTL-20-LCD Specifications
- MTL-30-LCD Specifications

DwyerLog User’s Guide Version 1.4x 10/33
Logged data can be retrieved from the logger at any time. You do not have to stop the logging session to retrieve
the data.
The graph display will be blank if there are less than two data points logged. The listing window will be blank if
there are no data points logged (as can happen during delayed logging, or when logging is set to start on button
press).
Automatic Data Retrieval
The DwyerLog Interface Software can be setup to automatically load the data from the logger into the computer as
samples become available. In this mode the graph and the listing windows are updated automatically with the new
data.
To enable this feature follow these steps:
• Make sure that your logger is connected to your computer.
• Make sure that the logger is logging data. Automatic retrieval is not available when the logger is not logging.
• Manually download the data for the first time by clicking the
button on the toolbar, or select Get Data from
the Logger menu.
• From the Logger menu select Auto Update.
The computer will download data as often as the sampling interval you setup. For instance, if you set your logger to
collect data once every minute, the software will perform a download once a minute. Of course the logger has to be
connected to your computer while the Auto Update mode is active.
When the Auto Update mode is active, the software does not change the zoom level of your graph. Instead it scrolls
the graph as new data becomes available.