
Installation manual


Appendix
27
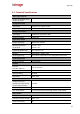
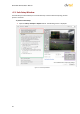
2. Open the Solo Setup tab. The following control icons are available on the Solo Setup
keypad:
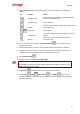
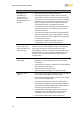
Icon
Function
Notes
Start Recording
Starts recording and browses to destination folder
where the clip will be saved
Stop Recording
Stops recording
Browse
Browses to the destination folder where clip is stored
and loads the clip
Play/Pause
Speed X1/X0
Fast Forward
Speed X2, X4, X8, X16. Click to increase or decrease
speed.
Rewind
Speed -X2, -X4, -X8, -X16. Click to increase or
decrease speed.
3. On the Solo Setup control keypad, click Start Recording to record a view in the
camera’s field of view.
4. Select a folder where to store the clip. Recording starts when the folder is selected.
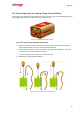
5. Walk through various locations across the vertical axis of the camera’s field of view in
order to place ground and height markers and guidelines in the clip.
6. Press Stop Recording .
7. Proceed to the tab for Step 1: Ground & Height.
Note:
For detailed instructions how to set markers and guidelines, follow instructions in the
HTML Edition Units User’s Guide.
8. Click Browse to load the clip from the folder where it is saved.
9. Use the Play , Pause , Fast Forward , and Rewind buttons on the
Solo Setup keypad to explore the clip. The status of the view is displayed on the bottom
left side of the screen.