
Installation manual


Workflows
7
Installation Workflow 3.2
Write down the unit’s IP address.
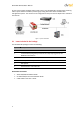
Assemble the video cameras, associate equipment, and unit in the camera
casing. Connect necessary internal wiring among the associated devices.
Mount the video unit (includes mounting brackets, casing, camera, and
encoder.)
Note:
Ensure necessary cooling, shelter and ventilation to maintain proper ambient
environment.
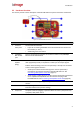
Connect the infrastructure wiring to the devices inside the camera casing,
including the unit to network, audio, video, relay output, power, RS485, etc.
Note which cameras and external devices connections (relay outputs) are
connected with descriptions. Note the camera model, as well as which
cameras are PTZ and which are stationary.
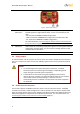
Turn on the cameras, matrix switcher, monitors as well as any external
devices (connected to the IOI-XTRK-10D unit through relay outputs).
Access the unit using the 32-bit version of Internet Explorer 8 or 9.
If you need to make changes to the unit’s network settings, access the unit
IP and make changes in the setup area of the HTML Edition Setup (IP, Sub-
mask and Gateway).
Note:
In order for the IOI-XTRK-10D to detect and track, the channel must be armed with
an active rule defined in the setup. For more information, refer to the HTML Edition
Units User’s Guide.
Post-Installation 3.3
The following general workflow outlines the tasks that will need to be done after installing the unit.
These post-installation procedures are mentioned in this document but are covered in greater detail
in the HTML Edition Units User’s Guide. Please refer to that guide for more detail.
Configure the IOI-XTRK-10D via its built-in HTML setup application.
Configure the unit and camera including relay outputs, etc. For more
information, refer to the HTML Edition Units User’s Guide.
Connect monitoring computers with a supported web browser or supported
RTSP device. If using analog only connect to the analog monitors.