
Installation guide


3-7
Installation
3
2
1
I
4
A
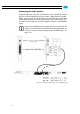
Connecting the Audio and RS-422 Panel
Depending on your setup the audio and RS-422 panel can be installed
as the audio panel #1 or 2 (see section “Note About the Audio Setup”
on page 2-9). The connection is made with a 26-pin flat cable to the
Atomix HDMI board. The remote control connection is made with a 12-
pin flat cable. Perform the internal connections as shown in the follow-
ing figure:
Figure 3-4: Internal connections of the audio and RS-422 panel
Prior to the installation of the panel you have to set/check the
jumpers on the printed circuit boards for the appropriate set-
tings (see section “Jumper Settings of the Audio and RS-422
Panel” on page 3-3).