
Installation guide


3-5
Installation
3
2
1
I
4
A
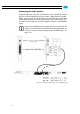
In the computer system remove the slot bracket from the PCI slot
where the Atomix HDMI board should be installed.
Insert the Atomix HDMI board into the PCI slot without using
excessive force or bending it.
Afterwards fasten the board with the screw from the slot bracket.
With this the Atomix HDMI board is installed in the computer system
and you can move on to the next step, i.e. to the installation of the pan-
els.
3.1.3 Installation of the Panels
As the third step you have to connect the delivered panels internally to
the Atomix HDMI board and install them in your computer system. For
this perform the following:
Remove as many slot brackets as you need for the additional pan-
els.
Now install the panels: Insert the panels of Atomix HDMI into the
empty slots and fasten each with a screw from the slot brackets.
Connect the cables to the appropriate Atomix HDMI board inter-
faces as detailed in the following:
The Atomix HDMI board must be installed in a slot providing
at least eight lanes (i.e. PCIe x8 or x16).
During the next step please observe not to break off any parts
of the PCI video board. Apply pressure to the slot panel and/
or the printed circuit board only, not to any of its attached
parts.
The chassis of the computer system where the Atomix HDMI
board is installed must be equipped with a sufficient ventila-
tion for cooling reasons.