
Installation guide


2-2
Atomix HDMI Installation Guide
2.1 Overview of the Video Board Product
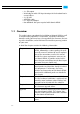
Atomix HDMI as a video board product consists of various individual
components that combined will give you the opportunity to develop
your own real-time video and film solutions. The diagram below shows
the different components included in the delivery of Atomix HDMI:
Figure 2-1: Atomix HDMI overview
The components of Atomix HDMI can be divided into hardware and
software components:
To the hardware components belong the items described in this instal-
lation guide. Atomix HDMI is centered around the Atomix HDMI
board, a 2/3-length PCIe bus single board for the real-time input and
output of uncompressed video and audio signals. All major video and
film formats are supported from SD video up to 4K film via SDI I/O or
HDMI (DVI via simple adapters), supplemented by up to 16 channels
audio either over AES/EBU or embedded in the video stream. To use all
the features of Atomix HDMI several slot panels may have been includ-
ed in your delivery as well as other accessories such as breakout cables.
All these items and their installation will be described in this manual.
Among the software components you can find the DVS software de-
velopment kit (DVS SDK) which can be used to build editing and stor-
age solutions with Atomix HDMI. The DVS SDK is compatible among
the video board products by DVS meaning your code can be used with
other DVS video boards as well. Several tools for hardware setup and
diagnostics complement the SDK. To run properly the video board driv-
er has to be loaded prior to using Atomix HDMI which can be done
with the tools for the hardware setup. The video board driver controls
the Atomix HDMI board and thus the in- and output of signals. The
DVS SDK as well as all other software components are described in the
separate SDK documentation.