
Owner's manual


Installation Instructions
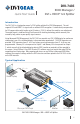
1.) Connect a DVI or HDMI source to the DVI input connector.
2.) Connect the monitors (or other sink devices) to the DVI output connectors.
3.) Connect the supplied AC power adapter to the +5V input, then connect the adapter to the AC source.
4.) The unit is ready to be used.
DVI-7435
EDID Manager / DVI + HDCP 1x2 Splitter
Quick Start Guide
3
Note 1: Slow blinking appears if HDMI signal is present on input and output port and fast
blinking indicates HDMI to DVI conversion. To turn ON/OFF HDMI to DVI conversion use
DVIGear’s Control software.
Note 2: The unit shows its 3 digit rmware version after powering on with red and green
blinks (FW 1.1.5 is: 1x red, 1x green, 5x green)
HDCP Enable / Disable Function
The HDCP Active LED indicates the source signal’s HDCP encryption. A blinking green LED indicates
the HDCP OFF function. To enable/disable HDCP operation, turn the rotary switches to memory
address #01 and press the LEARN button for approximately 3 seconds. Alternatively, DVIGear’s control
software may be used to enable/disable HDCP operation.
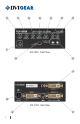
1. Status Indicator LEDs: Function When Blinking
a. Source +5V Source connected —
b. Signal Present DVI signal present on input HDMI signal on input
(1)
c. HDCP Active Active HDCP encryption HDCP disabled
d. Monitor 1 Hotplug Hot Plug detect: OUTPUT 1 is connected —
e. Monitor 2 Hotplug Hot Plug detect: OUTPUT 2 is connected —
f. EDID Status EDID validity, rmware version
(2)
EDID learn process
successful/failed (pg. 4)
g. Power Power On —
2. LEARN EDID Press to learn the EDID of the connected display – see page 4.
3. EDID ADDRESS Select the desired EDID using the two rotary switches – see page 4.
4. USB Control Use a USB cable to connect a PC to the unit.
5. OUTPUTS 1 and 2 Connect DVI / HDMI displays to DVI OUTPUT connectors.
6. INPUT Connect DVI / HDMI source device to DVI INPUT connector.
7. 5 VDC
The supplied AC Power Adapter includes a locking DC plug for a
secure connection.