
Operation Manual


2. Elements and their function
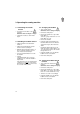
2.1 Elements at the machine head
Element function
Screw 1
– This screw for the sewing foot pressure is turned in
completely at the factory.
Therefore, do not change its adjustment!
Thread guide 2 – Depending on the material thickness, sewing thread
and stitch length, the position of the thread guide
must be adjusted such that controlled guiding of the
needle thread around the hook is assured.
When it is set at "0" the largest amount of thread is
released, as is required for very long stitches and
very thick material.
Turning knob 3 – Setting the additional tension engageable with lever
5 at the desired value.
Lever 4 – Opening the needle thread main tension and needle
thread additional tension.
Lever 5 – Activating and deactivating the additional tension.
To do this, unlock the lever by pulling it to the right,
and then change over.
Dial 6
– Set the "higher" foot stroke that has been activated
with the corresponding key or knee switch.
Dial 7
– Set the "smaller" foot stroke.
Sight glass 8 with
inlet opening
– Indicating the oil level in the reservoir. The oil level
must not drop below "MIN". If necessary, fill the oil
ESSO "SP NK 10" into the oil reservoir up to the
mark "MAX".
Turning knob 9 – Setting the reverse stitch length.
Turning knob 10 – Setting the forward stitch length.
Hand lever 11 – Changing the stitch length infinitely between the
adjusted forward and reverse stitch length.
Turning knob 12 – Setting the needle thread main tension at the
desired value.
Lever 13 – Determining whether the needle thread main tension
is opened or closed while the foot is lifted.
Lever up: Tension opened
Lever down: Tension closed
Needle 14
– When changing the needle, always turn off
the main switch.
Otherwise there is danger of injury!
Locking button 15 – Locking the sewing foot in its lifted position.
6