
Operation Manual


Settings via software
Operating Instructions 911-210 - 01.0 - 11/2015 55
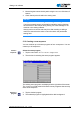
Select the
exact
stitch
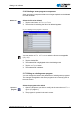
4. Use the arrow buttons to move the stitching point to the new position (1).
The modified seam path is displayed in green.
5. Tap the
Next button.
The window for entering the technology operations opens.
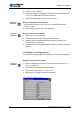
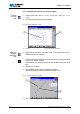
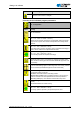
Fig. 45: Technology operations
Select
technolo-
gy opera-
tions
6. Select the desired technology operations for the new seam path,
5.4.5 Selecting options from a list, p. 36.
7. Confirm the selection with
OK.
You are returned to the detail window with the modified contour.
8. Tap the
Next button again.
A query dialog is displayed, asking if you wish to adopt the changes.
Agreeing to this dialog will save the modified contour.
Important: Always perform a contour test every time after modifying a
contour to ensure that the new seam path lies within the permissible sew-
ing field, 5.11 Performing a contour test, p. 48.
Damage to the machine through exceeding the sewing field size.
If you have entered contour points that lie outside the sewing field then
the movement of the clamps during sewing can cause damage to the
machine or the sewing material.
Always perform a contour test every time after creating or editing a
contour to ensure that the entire contour lies within the permissible
sewing field.
NOTICE