
Operation Manual


Settings via software
Operating Instructions 911-210 - 01.0 - 11/2015 47
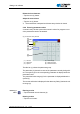
Seam parameters for Teach-In
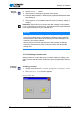
Drawing a path
Draw the
seam path
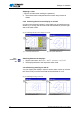
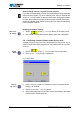
7. Use the arrow buttons to move the cursor to the end point of the desired
path.
Alternatively, you can tap an arrow button once in order to define the
direction and then continue moving in this direction by pressing the
pedal.
Important: Take care to ensure that the contour remains within the
permissible sewing field of your particular sewing unit. Especially with
curved paths, you should remember that the start and end points are
not directly connected and that a curve is generated between these
two points.
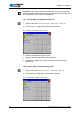
8. Tap the
OK button after entering the password.
The seam path is adopted with the specified parameters.
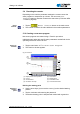
Add further seam paths
You can now define all further seam paths in the same manner.
Additional
paths
• Add each new seam path by starting at step 4 ( page 46).
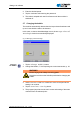
Deleting a
seam path
Deleting a seam path
• Tap the
Delete button.
The last section of the seam path is deleted.
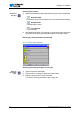
Save the program
After you have defined all the seam paths you can save the program and
specify a name for the program.
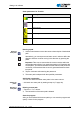
Button Meaning
Speed
Stitch length
Thread tension
Stroke height
Cut thread