
Operation Manual


2. Operation
Turn main switch off!
- Risk of Injury -
– when threading
– when replacing sewing tools e.g. needle
– when cleaning
– when leaving the work place unattended
– by maintenance work
2.1 Replacing the material guide rail by
primary seams
Turn main switch off!
- Risk of Injury! -
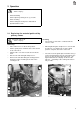
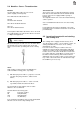
Removing
– Place valve lever 1 in the down position.
– Lift the guide piston 2 with its two rollers 9 and
8 out of the rail 3.
– Pull the rail 3 out of the needle area from the
front.
– Release the left and right clamp lever 7.
– Remove the rail after lifting the clamp piston 6
and place in the mounting at the left on the
covering hood.
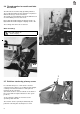
Inserting
– The insertion of the rail is conducted in the
reverse order.
– When tightening the clamp lever 7 care should
be taken to see that the pin 5 of the clamp
piston 6 snap into the hole 4 of the rail.
– The roller 8 of the guide piston and the roller_9
for the thread trimmer must be lowered into the
groove on the rail. Place the valve lever 1 up
again. Otherwise the display *Schiene* will
appear. - A starting of the sewing unit is then
not possible.
2
3
7
6
5
4
1
2
1
9
8
5