
Operation Manual


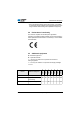
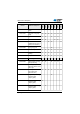


Table Of Contents
- 1 About these instructions
- 1.1 For whom are these instructions intended?
- 1.2 Representational conventions – Symbols and characters
- 1.3 Other documents
- 1.4 Liability
- 1.4.1 Transportation
- 1.4.2 Intended use
- 2 Performance description
- 2.1 Features
- 2.2 Declaration of conformity
- 2.3 Additional equipment
- 2.4 Technical data
- 3 Safety
- 3.1 Basic safety instructions
- 3.2 Signal words and icons used in warnings
- 4 Machine description
- 4.1 Control panel
- 4.2 Software description
- 4.2.1 Structure
- 4.2.2 Modes of operation
- 5 Operation
- 5.1 Switching the machine on and off
- 5.2 Activating and deactivating threading mode
- 5.3 Using threads and gimp threads
- 5.4 Removing and fitting clamping plates
- 5.5 Swiveling the sewing machine up and down
- 5.6 Threading the needle thread
- 5.7 Threading the looper thread
- 5.8 Threading the gimp thread
- 5.9 Adjusting the thread tension
- 5.9.1 Adjusting the needle thread tension
- 5.9.2 Setting the looper thread tension
- 5.10 Changing the needle
- 5.11 Changing the blade
- 5.12 Sewing
- 5.12.1 Sewing using the push buttons
- 5.12.2 Sewing with the foot pedal
- 5.13 Customer service
- 6 Maintenance
- 6.1 Inspection
- 6.2 Cleaning
- 6.3 Lubricating
- 6.4 Changing the cutting blocks and blade
- 6.4.1 Sub-class without multiflex
- 6.4.2 Sub-class with multiflex
- 7 Setup
- 7.1 Checking the scope of delivery
- 7.2 Removing the transport locks
- 7.3 Installing the frame
- 7.4 Fitting the table plate
- 7.5 Using the ring bolt
- 7.6 Securing the reel stand
- 7.7 Securing the frame
- 7.8 Setting the working height
- 7.9 Fitting the controller
- 7.10 Electrical connection
- 7.11 Equipotential bonding
- 7.12 Installing the suction container
- 7.13 Connecting the pneumatic system
- 7.14 Setting the operating pressure
- 7.15 Lubrication
- 7.16 Topping up the oil
- 7.17 Adjusting the material edge stops
- 7.18 Carrying out a test run
- 8 Software settings
- 8.1 User level
- 8.1.1 Basic operation
- 8.1.2 Single buttonhole mode
- 8.1.3 Sequential mode
- 8.1.4 Adjusting the cutting length
- 8.1.5 Adjusting the thread tension
- 8.1.6 Adjusting the cutting mode
- 8.1.7 Resetting the piece counter
- 8.2 Buttonhole programming
- 8.3 Sequence programming
- 8.3.1 Deleting a buttonhole at the end of a sequence
- 8.3.2 Adding a buttonhole at the end of a sequence
- 8.3.3 Inserting a buttonhole within a sequence
- 8.3.4 Switching off sequential mode
- 8.4 Service mode
- 9 Decommissioning
- 10 Disposal
- 11 Troubleshooting
- 11.1 Information messages
- 11.2 Error messages
- 12 Glossary
- 13 Appendix

Performance description
Operating Instructions 581 - 00.0 - 02/201514
• Due to the particular design of the machine arm, it is possible
to position the sewing material in the longitudinal direction when
using a different fabric holding device (additional equipment).
2.2 Declaration of conformity
The machine complies with the European regulations
regulating
occupational health and safety and environmental pro-
tection specified in the declaration of conformity or in the installa-
tion declaration.
2.3 Additional equipment
= Standard equipment
= Optional extension
= Can only be ordered in conjunction with the E1151
sewing equipment
= Can only be ordered in conjunction with length packages
L1 or L2
Part no. Additional equipment
581-112
581-121
581-141
581-151
581-312
581-321
581-341
0580 590074 Thread puller
0580 590504 Support table for working
while standing
0580 591684 Gimp monitoring