
Operation Manual


5.6 Adjusting looper-thread tension
Caution - danger of injury
Turn off the main switch.
The looper-thread tension may only be adjusted with the
sewing machine switched off.
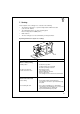
Adjusting tensioning spring 2
–
Release right-hand needle-plate slide and push aside.
–
Adjust tensioning spring 2 by rotating regulating screw 1.
To increase looper-thread tension:= rotate screw 1 clockwise
To decrease looper-thread tension= rotate screw 1 anti-clockwise
–
Push needle-plate slide back into place.
Note:
The conical spring in the bobbin housing has the following functions:
–
When the bobbin-housing shutter is open it raises the bobbin slightly for removal.
–
It prevents the bobbin from "running on" when the machine halts or if the looper
thread is wound off spasmodically.
5.7 Fitting and replacing the needle
Caution - danger of injury
Turn off the main switch.
The needle may only be changed with the sewing machine
switched off.
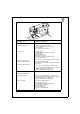
–
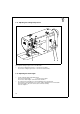
Rotate the handwheel until the needle bar 3 has reached its uppermost position.
–
Undo screw 4.
–
Draw the needle downwards out of the needle bar 3.
–
Insert a new needle as far as it will go into the hole in the needle bar 3.
Important
When viewed from the operating side of the sewing machine the furrow 5 of the
needle must point to the right (see sketch).
–
Tighten screw 4.
IMPORTANT
When fitting a thicker needle the distance of the shuttle
from the needle must be corrected (see Servicing
instructions).
Failure to comply with the above note may lead to the following errors:
when fitting a thinner needle: faulty stitches, damage to thread
when fitting a thicker needle: damage to the shuttle tip and needle
13