
Troubleshooting guide


14
in your measurements.
(b) Pipe and
Fitting Requirements.
The bottom 5 foot section
of vent will be Flex Pipe
(used to get around the
smoke shelf, and to
connect to the appliance).
The remainder will be
rigid B-Vent Pipe
Sections. For each pipe
joint, subtract 1-1/2 inches.
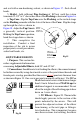
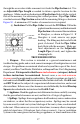
(c). Connector. Read the appliance manufac-
turer's instructions for connecting the Flex Pipe to the
appliance. In most cases, a Draft Hood Connector will be required as shown
in Figure 26. If you are not sure, contact the appliance manufacturer for
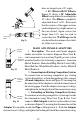
clarification. Place the appliance out in front of the fireplace area, as shown in
Figure 27, and install the Draft Hood Connector, or other device in accordance
with the appliance instructions. The
Flex Pipe Coupling may be able to
attach directly to the appliance.
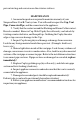
(d). Flex Pipe Assembly.
Assemble first Rigid Pipe Section
to the Flex Pipe, insuring that the
"UP" arrows are in fact, pointing up.
Push the sections together and twist
to lock. Screws are not required,
however if you desire to use them,
use #8 sheet metal screws 1/4-inch
long, being careful not to penetrate
the inner liner. Repeat this process
for the remainder of the Pipe Sec-
tions, and lower the assembly down
the chimney. Lower it below it's
normal position as shown in Figure
28.
(e). Position and Connect
Fig 26
DRAFT HOOD
CONNECTOR
Fig 27
APPLY
NON-HARDENING
SEALANT
GAS RELINING
TERMINATION
ASSEMBLY
MASONRY
ANCHORS
Fig 28
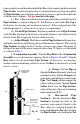
NON-HARDENING
SEALANT
TRIM BASE
TO FIT
MASONRY