
User guide

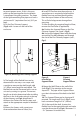


5. Close locking tabs on ex adapter so
tabs seat in the ex pipe. Slight adjustment
of pipe may be needed to ensure proper
engagement.
that is lined with a clay or concrete liner,
check to see if a short portion of the tile is
sticking out of the top of the chimney. If so,
this short top portion must be broken o to
permit the termination's ashing to sit down
ush on the chimney's crown. It is best to do
this prior to beginning the installation.
1. Determine the required location of the
opening within the enclosure. Ensure the ue
access cut-out meets the minimum specied
size to allow manual assembly of connections
within the ue. With masonry chimneys, the
breech opening may have to be enlarged
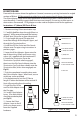
FLEX CHIMNEY LINING KIT
1
6
13
12
11
10
7
9
8
7
5
4
3
2
1. Wall Plate
2. Support Elbow
3. Flex Chimney Support
4. Flex Male Adapter
5. Clamp (or Tie)
6. Flex Coupler
7. Gasket
8. Flex Liner
9. Spacer
10. Support Bracket
11. Flex
Female Adapter
12. Flex Chimney
Cap Flashing
13. Termination
Pipe
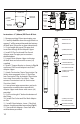
FLEX PULLER
A ex puller is an optional component
available to help ease installation of PP
Flex through enclosures (Fig.3). The
2"(60mm) version is of dierent design than
3"-5"(80mm-130mm).
2" Dia: Unscrew ceramic holder from cone.
Install ceramic holder around PP Flex pipe,
and re-install into cone.
3"-5" Dia: Connected using bayonet style
connection with a rotating movement of 1/4
turn to lock in.
MASONRY / SHEET ROCK
ENCLOSURE:
Examine the chimney or enclosure
carefully for obstructions prior to starting
an installation. Any structural defects or
potential safety problems must be repaired
prior to relining, and the enclsoure should be
clean. If working with a masonry chimney
Figure 3, Flex Puller
RoPe
6