
Installation Guide


14
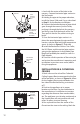
until the pipe is truly vertical. Tighten the
bolts in the Clamp. Note that the overall
length of the pellet vent pipe as assembled,
can be no longer than 42 feet.
11. Slip the Flashing over the pipe section(s)
protruding through the roof. Secure the base
to the roof with roong nails as shown in
Figure 24. Insure that the roong material
overlaps the top edge of the Flashing (Refer
to Figure 2).
CLEANING AND MAINTENANCE
1. Have your system cleaned by a certied
chimney sweep if you have doubts about
your ability to clean it. Use a plastic or exible
steel brush. Do not use a sti brush that
will scratch the stainless steel liner of your
system.
2. PelletVent systems must be installed so
that access is provided for inspection and
cleaning.
3. The pellet vent should be inspected at
least once every month during the heating
season.
4. Do not use chemical cleaners. They can
damage the vent pipe.
5. To increase pellet vent life, coat all
exterior metal parts with high temperature,
rustproof paint. This is highly recommended,
particularly in areas near the ocean.
6. In case of a chimney re, close all appliance
draft openings, shut o pellet appliance and
call your Fire Department. Do not use the
appliance or vent until it has been inspected
for possible damage.
7. DuraVent is not responsible for ue by-
products that might discolor roofs or walls.
Fuel: Be sure to follow the recommendations
of the appliance manufacturer for the type of
fuel to use.
Vent Runs: Condensate is more likely to
form in longer vents because the exhaust
temperature cools further away from the
appliance. If the exhaust cools to a certain
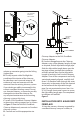
Figure 22
TRIM
2” BELOW
FINISHED
CEILING
CATHEDRAL
CEILING
SUPPORT BOX
LEVEL
12” MINIMUM
Figure 23
Figure 24
USE NONHARDENING
SEALANT
WHERE STORM
COLLAR SITS
ON FLASHING
CLAMP
TRIM