
Installation Guide


13
point on the ceiling where the plumb line
intersects. This represents the center of the
support box. Drill a small hole through the
ceiling at this point, so it can be located from
the top of the roof.
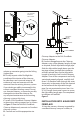
4. From the roof, locate and mark the outline
of the Support Box.
5. Remove shingles or other roof covering as
necessary to cut the rectangular hole for the
Support Box. Cut the hole 1/8" larger than the
dimensions of the Support Box. (Figure 19).
The rectangular hole should be centered on
the small hole which you drilled through the
ceiling to mark the location. Again, verify that
you are not cutting through rafters or framing
members.
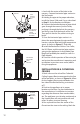
6. Run the Support Box through the roof
as shown in Figure 20, and place it so that
the bottom of the Support Box protrudes at
least 2" below the nished ceiling. Align the
Support Box vertically and horizontally with
a level. Temporarily tack the Support Box in
place through the inside walls and into the
roof sheathing.
7. Using tin snips, cut the Support Box from
the top corners down to the roof line, and
fold the resulting ap over the roof sheathing
(Figure 21). Before nailing it to roof, run a
bead of non-hardening sealant around the
outside top edges of the Support Box so as
to make a seal between the box and the roof.
Clean out any combustible material or debris
from inside the Support Box.
8. Place the Pipe Clamp, (which comes as a
component of the Support Box) around the
top of the hole in the bottom of the Support
Box (Figure 23).
9. Connect the necessary amount of pipe
sections to reach the stove at a point where
the Cap will be at least 12" above the roof
(Figure 22).
10. Run the assembled pieces of pellet
vent pipe down through the Clamp of the
Support Box and connect to the appliance
with a Pipe Adapter. Using a level, make slight
adjustments in the position of the appliance
Figure 18
Figure 19
Figure 20
Figure 21