
Installation Guide


12
is level with the center of the hole in the
masonry. Connect horizontal pipe section to
the Tee branch.
5. Holding the pipe at the proper elevation,
install the Storm Collar and Cap, as described
in Step 11 for the replace installation.
6. Connect the horizontal piece of pipe which
goes through the masonry to the Tee by
pushing it through the hole in the masonry,
and lining it up with the branch of the Tee.
Then push it into the Tee, while twisting to
lock it.
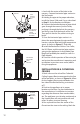
7. Once the horizontal pipe section is in
place, the space between the pipe and the
masonry may be lled with high temperature
grout, as shown in Figure 17, if desired.
8. Install the Reduction Collar or Trim Collar,
the 90° Elbow, and the vertical pipe section
going to the appliance. An Adjustable Pipe
length will probably be needed, as well as a
Pipe Adapter.
9. Conduct a nal inspection of the entire job,
and review the manufacturer’s operating and
installation instructions once more, before
ring the appliance.
INSTALLATION IN A CATHEDRAL
CEILING
1. Mark a line on the side of the Cathedral
Ceiling Support Box to correspond to the line
of the roof pitch, as shown in Figure 18. Allow
for the Support Box to protrude below the
low side of the nished ceiling a minimum
of 2".
2. Position the appliance at its proper
location on the oor. Pay close attention to
the manufacturer’s installation instructions
regarding the distances from combustibles,
etc. The appliance must also be positioned so
the Support Box will not interfere with roof
rafters or other structural framing.
3. Run a plumb line from the center of the
ue exit on the stove to the ceiling. Mark the
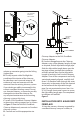
Figure 15
USE MASONRY
ANCHORS TO
SECURE
FLASHING TO
MASONRY
TRIM
BASE TO
FIT FLUE
TILE
NONHARDENING
SEALANT
Figure 16
Figure 17
FILL SPACE
BETWEEN
PIPE AND
MASONRY
WITH
GROUT
REDUCTION
COLLAR OR
TRIM
COLLAR
TEE