
Ceiling Cassette Installation Manual

DURASTAR.COM
20
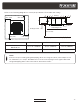
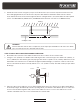
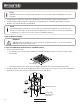
2. Using adhesive vinyl tape, attach the drain pipe to the underside of the refrigerant pipes.
3. Using insulation tape, wrap the signal wire, refrigerant pipes, and drain pipe tightly together.
Double-check that all items are bundled.
NOTE
DO NOT intertwine the signal cable with any of the other wires while bundling these items
together.
NOTE
When wrapping the bundle, keep the ends of the piping unwrapped. You need to access
them to test for leaks at the end of the installation process (refer to the Electrical and Gas
Leak Checks section of the outdoor unit's installation manual).
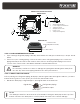
STEP 8: INSTALL PANEL
WARNING
DO NOT place the panel face down on the floor, against a wall, or on uneven surfaces.
Damage to the panel may result.
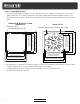
For Models DRAC09F1A, DRAC12F1A, and DRAC18F1A
1. Remove the inner panel.
• Push both of the release tabs towards the middle simultaneously to unlock the latch on the
inner panel.
Release tabs
Screws (M5 -
supplied with
the panel)
Main panel body
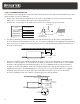
• Hold the panel at a 45 angle, lift it up slightly and detach it from the main panel body.
2. Install the main panel body by aligning the arrow on the panel to the arrow on the unit. Attach the
panel body to the unit with the supplied screws as shown below.