
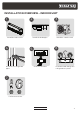
Floor/Ceiling Mount Installation Manual


DURASTAR.COM16
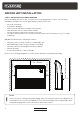
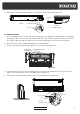
STEP 3: DRILL WALL HOLE FOR CONNECTIVE PIPING
1. Determine the location of the wall hole based on the location of the outdoor unit.
2. Using a 2 1/2" (65mm) core drill for units with a gas side connective pipe less than 5/8" (16mm),
or 3 1/2" (90mm) for units with a gas side pipe greater than or equal to 5/8" (16mm), drill a hole
in the wall. Make sure that the hole is drilled at a slight downward angle, so that the outdoor
end of the hole is lower than the indoor end by about 3/16 - 1/4" (5mm to 7mm). This will ensure
proper water drainage.
Wall
Indoor Outdoor
3/16-1/4”
(5-7 mm)
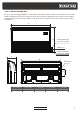
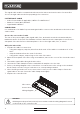
STEP 4: CONNECT DRAIN PIPE
The drain pipe is used to drain condensate water away from the unit. Improper installation may
cause leaks and unit or property damage.
1. Connect the drain pipe (field supplied) to the unit's connecting port using a metal worm clamp.
Make sure it secured tightly and can not be easily pulled loose.
2. Insulate the connecting port and pipe with the accessory sheath provided.
Drain pipe
connecting port
Drain pipe
Pipe clamp
Insulation
Downward slope
1/100
Ceiling
39-59”
(990mm-
1500mm)
≥4”
(101mm)
Downward slope
1/100
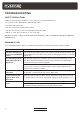
Model
DRAF18F1A 1” (25mm)
DRAF24F1A 1” (25mm)
Drain Pipe
Inner Diameter
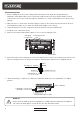
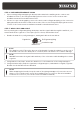
3. Place the protective wall hole sleeve (field supplied) into the hole. This protects pipes and
cables from sharp edges and will help seal the opening when you finish the installation process.
After the sleeve is inserted through the wall, connect the wall hole sleeve cover to the wall
sleeve on the outside end. Make sure the cover is flush with the outside wall.
3. Install the drain pipe with a downward slope of at least a 1/100 gradient to prevent water from
flowing back into the unit. If connecting multiple units, install the pipes as illustrated. Wrap the
remaining indoor portion of drain pipe with foam pipe insulation to prevent condensation.