
Ceiling Cassette Installation Manual

DURASTAR.COM
19
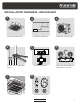
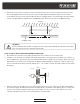
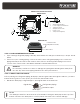
1 Control box lid
2 Wiring diagram label
3 Power supply terminal block
4 Clamp for wiring
5 Wiring between units
6 Plastic cover
7 Clamp (field supplied)
Wire outlet
Control box lid
(wiring diagram on inside)
DRAC09F1A, DRAC12F1A and
DRAC18F1A
DRAC24F1A
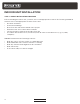
STEP 6: PREPARE REFRIGERANT PIPING
1. If pre-existing refrigerant piping is already embedded in the wall, proceed directly to Step 8: Install
Panel.
2. If there is no pre-existing piping, connect the indoor unit’s refrigerant piping to the connective
piping that will join the indoor and outdoor units. Refer to the Refrigerant Piping Connections
section of the outdoor unit's installation manual for detailed instructions.
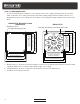
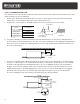
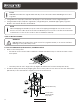
Refrigerant piping
Drain pipe
Signal wire
Insulation tape
STEP 7: WRAP PIPES AND CABLE
Before passing the refrigerant piping, drain pipe, and the signal cable through the wall hole, you must
bundle them together to save space, protect them, and insulate them.
1. Bundle the drain pipe, refrigerant pipes, and signal cable as shown below:
WARNING
Be extremely careful not to dent or damage the piping while bending them away from
the unit. Any dents in the piping will affect the unit’s performance.
NOTE
The drain pipe MUST be at the bottom of the bundle. Putting the drain pipe at the top of the
bundle can cause the drain pan to overflow, which can lead to fire or water damage.