
Installation Sheet - DRAS12F1B


DURASTAR.COM
15
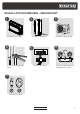
STEP 6: CONNECT SIGNAL CABLE
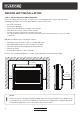
BEFORE PERFORMING ANY ELECTRICAL WORK, READ THESE REGULATIONS
1. All wiring must comply with local and national electrical codes and regulations, and must be
installed by a licensed electrician.
2. All electrical connections must be made according to the Electrical Connection Diagram
located on the panels of the indoor and outdoor units.
3. If there is a serious safety issue with the power supply, stop work immediately and contact
a licensed electrician. Do not continue with the installation until the safety issue is properly
resolved.
4. Power voltage should be within 90-110% of rated voltage. Insufficient power supply can cause
malfunction, electrical shock, or fire.
5. If connecting power to fixed wiring, install a surge protector and main power switch with a
capacity of 1.5 times the maximum current of the unit.
6. If connecting power to fixed wiring, a switch or circuit breaker that disconnects all poles and
has a contact separation of at least 1/8" (3mm) must be incorporated in the fixed wiring. A
qualified technician must use an approved circuit breaker or switch.
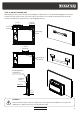
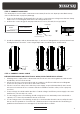
STEP 5: CONNECT DRAIN PIPE
The drain pipe is used to drain condensate water away from the unit. Improper installation may
cause leaks and unit or property damage.
1. Connect the drain pipe (field supplied) to the unit's connecting port using a metal worm clamp.
Make sure it secured tightly and can not be easily pulled loose.
2. Insulate the connecting port and pipe with the accessory sheath (sleeve) provided.
Drain pipe
connection port
Drain pipe
Pipe clasp
Insulation
Slope 1/100
≥4”
(101mm)
Slope 1/100
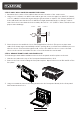
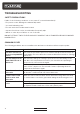
Model
DRAS12F1A 5/8” (16mm)
Drain Pipe
Inner Diameter
3. Install the drain pipe with a downward slope of at least a 1/100 gradient to prevent water from
flowing back into the unit. If connecting multiple units, install the pipes as illustrated.