
Installation Sheet - DRAS12F1B


DURASTAR.COM
17
WARNING
All wiring must be performed strictly in accordance with the wiring diagram located
on the inside of the control box lid.
STEP 7: PREPARE REFRIGERANT PIPING
1. If pre-existing refrigerant piping is already embedded in the wall, begin the outdoor unit
installation. Refer to the Refrigerant Piping Connections section of the outdoor unit's
installation manual for detailed instructions.
2. If there is no pre-existing piping, connect the indoor unit’s refrigerant piping to the connective
piping that will join the indoor and outdoor units. Refer to the Refrigerant Piping Connections
section of the outdoor unit's installation manual for detailed instructions.
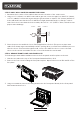
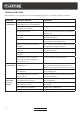
Refrigerant piping
Drain pipe
Signal wire
Insulation tape
STEP 8: WRAP PIPES AND CABLE
Before passing the refrigerant piping, drain pipe, and the signal cable through the wall hole, you
must bundle them together to save space, protect them, and insulate them.
1. Bundle the drain pipe, refrigerant pipes, and signal cable as shown below:
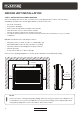
Wiring diagram
Electrical box
Sensor bracket
NOTE
The drain pipe MUST be at the bottom of the bundle. Putting the drain pipe at the top of
the bundle can cause the drain pan to overflow, which can lead to fire or water damage.
NOTE
DO NOT intertwine the signal cable with any of the other wires while bundling these items
together.
NOTE
When wrapping the bundle, keep the ends of the piping unwrapped. You need to access
them to test for leaks at the end of the installation process (refer to Electrical and Gas
Leak Checks section of the outdoor unit's installation manual).
2. Using adhesive vinyl tape, attach the drain pipe to the underside of the refrigerant pipes.
3. Using insulation tape, wrap the signal wire, refrigerant pipes, and drain pipe tightly together.
Double-check that all items are bundled.