
Installation Guide

www.dural.com
DURAL GmbH
Südring 11
D-56412 Ruppach-Goldhausen
Tel. +49 (0) 2602/9261-0
Fax +49 (0) 2602/9261-50
info@dural.com
EXP
07/2016
Composite waterproof mat for walls and
oors in indoor areas
- Installation Instructions -
DURABASE WP 2/2
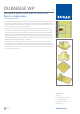
3. Produce a watertight seal for transitional areas between walls and oors with WP sealing tape.
Seal internal and external facing corners, as well as pipe connections, using DURABASE FLEX
customised prefabricated moulded parts, making sure to bond these across the entire surface
area to the suboor, sealing layer or penetrations.
4. Embed the entire surface of the blank side of the cut-to-size mats into the adhesive. Here,
pay attention to the adhesive bonding open time. Then use a smooth trowel or the smooth
side of the serrated trowel to press the entire surface of the carrier fabric into the adhesive.
Make sure you run the smooth side of the trowel over the matting at an angle, applying
pressure in order to force out any air pockets work from the centre of the matting outwards.
Loose laying of the WP mats is not possible. Lay the joints with an overlap of around 5–8 cm.
Make sure that the overlap bonding is waterproof.
5. Then the tiles can be laid directly onto the matting using the thin-bed procedure it’s not
necessary to wait for the adhesive to dry. The generally recognised rules of tile laying must
always be observed, i.e. application of the thin-bed or exible adhesive using a trowel with the
corresponding notch size. For surfaces which are subject to chemical loading, use a suitable
grout product (reactive resin).