
Operating instructions


-8-
3. Check each component for shipping damage. If components are damaged, contact the store
where purchased or Duraame, Inc.
4. a1. If installing this unit in a rebox, check the rebox dimensions to ensure that they are at least
equal to the minimum dimensions shown in Figure 2. The minimum clearances that the appliance
originally required will be adequate for this installation. You will need the two (2) ¼” x 1 ½” masonry
screws and the two hold downs provided for this step. Orient the unit so the door is on the left
and the igniter and shutoff knob are on the right. Remove the two back legs by unscrewing
them. Install the two hold downs on each leg and reinstall the back legs. Place the burner /
base in a solid-fuel-burning masonry replace, a UL127 factory-built replace, or an approved
(to ANSI Z21.92) ventless rebox, centered left to right on a level surface. When it is positioned
properly, mark the screw locations through the screw-down holes in the hold downs. If you
are installing the appliance in a brick-bottomed replace, mark the screw locations in a mortar
joint between the bricks. Remove the appliance, and drill holes at the marked locations using
a 3/16” masonry drill bit. Replace the appliance, and attach it to the replace oor using the
masonry screws. a2. For this appliance to function properly, the burner / base must be stable
and level. If the oor of your replace is uneven or out of level, you must unscrew or screw
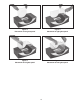
down the legs so the unit ends up level and not wobbly. a3. Install the four glass panes in the
slots on the unit (see Figures 3-6). The small panes go on the sides and the large panes go in
the front and back. a4. As an option you can place loose decorative glass or small rocks in the
areas between the front glass (or back glass or both) and the burner. Make sure the top level of
the loose material is not higher (could be lower) than the top of the burner. The material has to
be larger than 3/16” in size and smaller than 1” in size for each piece. These materials could be
purchased from your supplier or at the store you bought the unit from and could be made from
glass or stone as long as they are non combustibe and they can withstand high temperatures.
5. If installing this unit on a table or cabinet, make sure the surface the appliance is placed on is
non combustible and can withstand a temperature of at least 150°F without discoloring. If the
appliance is placed on a table, make sure the table is sturdy and does not move or wobble to
make sure that the ethanol that is burning does not spill if somebody bumps into the table by
mistake. Also make sure the table has at least two feet of surface space between the edge
of the appliance and the edge of the table on all sides. Make sure the unit is installed away
from trafc and that children or pets do not come close to it. The unit gets hot and contains
combustible uid in it that could spill if bumped.
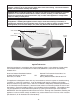
6. Next step is to install the battery into the igniter. The igniter is on the right side of the appliance
in the middle side(see Figure 1). The button and front cover of the igniter twists off (see Figure
1). Twist the front off, install the battery and twist the front back on. Push the button and you
should hear the sparker creating the sparks. If you do not hear or see the sparks, you either
have a dead battery or you did not install the battery properly. If after remedying both issues
the sparker still does not create a spark, contact the installer, the store where you purchased
the product or Duraame, Inc.