
Instructions / Assembly


Cutting: To cut DuraDecor, measure, mark and carefully use a
sharp utility knife and a framer’s or speed square to score the
product from the top side, snap it down and finish the cut from
the backside to trim the release film at the same time alternatively,
cut using a guillotine style tile cutter. For complicated cuts.
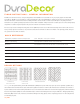
Installation: Remove the release paper from the back of each
plank as you go and immediately place the release paper in a
trash bag. Be very careful to position the flooring in the correct
position following your starter line before applying any pressure,
then install the next keeping it snug to the last, continue and
complete one row at a time. Leave a 1/32-inch gap around the
entire perimeter to allow for any expansion. After each row is
completed, roll firmly using a 100 lb. three-section roller, or a
wall or laminating three-section roller with extendable handle (~
9-inch wide) and your body weight to press the flooring down
into the adhesive. Rolling is very important as the adhesive is
pressure sensitive, and failure to roll may result in bond failure.
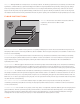
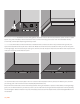
The off-cut from the previous row may be used as a starter for
one of the following rows, making sure the end joints are random
and at least 6-inches apart from the previous row, plus at least
9-inches in length. When finished, replace any wall trim, cove
base, or moldings.
>6"
MAINTENANCE INSTRUCTIONS
Precautions: Do not perform any wet maintenance procedures on the floor for 72-hours. Remove all metal objects before wetting the
flooring. Do not use dust mops treated with oils or silicones, acetone, strong alkaline cleaning agents, multi-surface cleaners, vinegar/
ammonia/ citrus oil solutions, scouring powder, strong solvents, or abrasive cleaning pads, as these can damage the flooring. The
application of a floor finish is not usually required. Prohibit foot traffic until the floor is completely dry.
Regular Cleaning: Dust mop or vacuum (without a beater bar) the floor to remove any dirt or grit. Damp mop the flooring and walls as
often as required using a clean, flat microfiber mop and a suitable diluted vinyl floor cleaning solution (neutral pH).
July 2019