polishedpro | 5.
polishedpro | 5.2mm Rigid Core General Information Limitations The optimal operating temperature for use is between 40°F to 90°F (4°C to 32°C). Avoid prolonged exposure to direct sunlight or other heat sources where temperatures will exceed 90°F (32°C), as discoloration or damage may occur. This product is not suitable for heavy rolling loads or heavy commercial areas. Do not install in areas that may be subjected to sharp, pointed objects, such as stiletto heels, cleats or spikes.
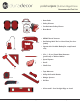
polishedpro | 5.2mm Rigid Core Recommended Tool List • Knee Pads • Safety Glasses • Cut-Resistant Safety Gloves • Dust Mask • HEPA-Filtered Vacuum • Oscillating Multi-Tool or Hand Saw (for door jambs) • Jigsaw with Carbide Blades(for complicated cuts) • 2 lb. (~32 oz.
polishedpro | 5.2mm Rigid Core Installation Instructions 1. Substrate Preparation General Substrate Guidelines Ensure the substrate is clean, dry, flat, sound and suitably prepared according to these instructions prior to installation, as manufacturer is not responsible for problems related to substrates that have not been properly prepared.
polishedpro | 5.2mm Rigid Core Installation Instructions vinyl or linoleum, as well as existing hard surface flooring substrates, such as terrazzo, porcelain or ceramic tile. Ensure existing flooring is a single layer and is clean, dry, sound, solid and well adhered. All loose material must be removed and repaired or replaced. All grout lines and wide seams greater than 1/4-in.
polishedpro | 5.2mm Rigid Core Installation Instructions ≥ 1/2-in. expansion gap. Expansion Joint When the total flooring length or width exceeds 85 feet, a compatible t-molding must be installed to create an expansion joint. Expansion joints must be wide enough to accommodate an appropriate accessory and allow for the appropriate expansion gap on either side. Accessories must cover the flooring material by at least 1/8-in. on each side and must be glued or anchored directly to the substrate.
polishedpro | 5.2mm Rigid Core previous row, and follow the "Side Joints" detail below. Side Joints (Angle) Starting at the left corner, typically with a cut piece, insert the side without an extended locking mechanism (tongue) into the previous row at a ~25° angle. Make sure it is properly seated and slides freely, then slide the piece into position. The end joint must either be flush with the wedge spacer (first piece) or be closely aligned with the end of the previous piece.