
User Guide


13
Dual Element Heater with Fusible Link
The front grill and top of the insert must be removed to service the heater assembly. Refer to Figure 1 and
Figure 2. Lift the top off but leave the touch pad and temperature pot plugged in, be careful not to short
circuit against the insert casing. Rest the top on the casing so that the touch keypad points straight up.
Insolate the touch keypad from the casing with cardboard. With 120vac cord plugged in, temperature pot
turned to “HI”, turn the insert on via the touch keypad. Next select low on the touch keypad, the blower
should start running and 10 seconds later the low heat should start; you will hear the contacts clicking of
the control relay on the main control board. If low heat does not come on, check for 120vac at the fusible
link. Place common test lead on the common terminal of the dual element heater marked “A” and the hot
test lead on the right hand terminal of the fusible link marked “B”. Refer to Figure 16.
Figure 16, fusible link
If 120vac is present, place the hot test lead to the left hand side of the fusible link marked “C” with the
common in the same location. Refer to Figure 16. If 120vac is not present let the unit cool down in order
to clear the fusible link. Wait 5 minutes and repeat test. When after repeating the test and there isn’t any
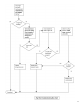
120vac present then check for 120vac present between the 750W (lower terminal) and AC-N3 on the
main control board. Refer to Figure 17.
Figure 17
Common location “A”
Left hand side of fusible link location “C”
Right hand side of fusible link location ”B”
AC-N3
750W (lower terminal)