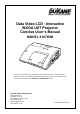
Data Video LCD - Interactive WXGA UST Projector Concise User’s Manual Model 8107HWI Information in this Guide may change due to product improvements. To obtain the latest manuals, literature, and software please visit the Dukane web site at; www.dukane.com/av and look at the specific model SUPPORT or DOWNLOADS section. DUKANE CORP AV SERVICE DEPT 2900 Dukane Drive St Charles, IL 60174 800-676-2487 / 630-762-4032 Fax 630-584-5156 avservice@dukane.com www.dukane.
Projector 8107HWI Thank you for purchasing this projector. Please read through this manual before using this product, in order to use safely and utilize well the product. WARNING ►Before using this product, be sure to read all manuals for this product. See the “Using the CD manual” ( 19) to read the manuals in the CD. After reading them, store them in a safe place for future reference. ►Heed all the warnings and cautions in the manuals or on the product.
First of all Entries and graphical symbols explanation The following entries and graphical symbols are used for the manuals and the product as follows, for safety purpose. Please know their meanings beforehand, and heed them. WARNING This entry warns of a risk of serious personal injury or even death. CAUTION This entry warns of a risk of personal injury or physical damage. NOTICE This entry notices of fear of causing trouble.
Regulatory notices This is a Class A product. In a domestic environment this product may cause radio interference in which case the user may be required to take adequate measures. This product may cause interference if used in residential areas. Such use must be avoided unless the user takes special measures to reduce electromagnetic emissions to prevent interference to the reception of radio and television broadcasts. In Canada This Class A digital apparatus complies with Canadian ICES-003.
Regulatory notices (continued) About Waste Electrical and Electronic Equipment The mark is in compliance with the Waste Electrical and Electronic Equipment Directive 2002/96/EC (WEEE). The mark indicates the requirement NOT to dispose the equipment including any spent or discarded batteries or accumulators as unsorted municipal waste, but use the return and collection systems available.
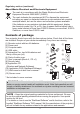
Arrangement a Screen size (diagonal) b1 , b2 Projection distance (±8%) c1 , c2 Screen height (±8%) • For the case of installation in special conditions such as on the wall or ceiling, the specified mounting accessories ( 20) and service may be required. Before installing the projector, consult your dealer about your installation. • The screen position may shift after installation if the projector is mounted on locations such as the wall or ceiling, due to the flexibility of the plastic projector body.
Connecting with your devices Be sure to read the manuals for devices before connecting them to the projector. Make sure that all the devices are suitable to be connected with this product, and prepare the cables required to connect. Refer to figures F-3 to F-6 at the back of this manual. For details, please see “User's Manual” - “Operating Guide” and “Network Guide”.
NOTE • If a loud feedback noise is produced from the speaker, move the microphone away from the speaker. • This projector doesn't support plug-in power for the microphone. • The COMPUTER IN1/2 port can support a component signal also. The specific adapter or the specific cable is required for a component video input to the projector. • To use the Interactive Function, it is necessary to install the “StarBoard Software” in the DVD-ROM on the computer.
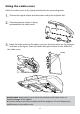
Using the cable cover Utilize the cable cover as the guard and blind for the connecting parts. 1. Connect the signal cables and the power cord to the projector first. parts as shown in figure, 2. Combine and assemble the cable cover. 3 3 1 2 1 2 the three knobs on the cable cover into the three holes on the projector 3. Insert as shown in the figure. Pass the cables through the holes on the bottom of the cable cover.
sure that the power cord is firmly 1. Make and correctly connected to the projector STANDBY/ON button POWER indicator and the outlet. Make sure that the POWER indicator is steady orange. Confirm that there is nothing that the lens door hits while opening. Press the STANDBY/ON button on the projector or the remote control. The lens door opens, the projection lamp lights up, and the POWER indicator begins to blink green.
Adjusting the projector's elevator The projector has Front foot for inclinations and Rear foot for horizontals. Spacers on the each elevator foot are installed at the time of shipment, and projector is in a condition to be able to just project. If necessary, detach the spacer, and the elevator feet can be manually twisted to make more precise adjustments. 2.3~4.
ASPECT button VIDEO ASPECT MAGNIFY MY SOURCE/ COMPUTER DOC.CAMERA AUTO FREEZE VOLUME+/- button SEARCH BLANK PAGE UP VOLUME 㧗 ON DOWN OFF Selecting an aspect ratio KEYSTONE Each time you press the ASPECT button on the remote control, it switches the aspect ratio of the image, in turn. - FOCUS MY BUTTON 1 + - MUTE 2 D-ZOOM + MENU POSITION ENTER ESC Zooming Use the D-ZOOM + and D-ZOOM – buttons on the remote control to adjust the screen size.
Turning off the power STANDBY/ON button Press the STANDBY/ON button on the POWER indicator projector or the remote control. The message “Power off?” will appear on the screen for about 5 seconds. Confirm that there is nothing that the lens door hits while closing. Press the STANDBY/ON button again while the message appears. If the pen sensor is within easy reach, attach the sensor cover provided to keep it from getting dusty.
A lamp has finite product life. Using the lamp for long periods of time could cause the pictures darker or the color tone poor. Note that each lamp has a different lifetime, and some may burst or burn out soon after you start using them. Preparation of a new lamp and early replacement are recommended. To prepare a new lamp, make contact with your dealer and tell the lamp type number. Type number : 456-8104HW lamp cover Turn the projector off, and unplug the power cord.
Replacing the lamp (continued) HIGH VOLTAGE HIGH TEMPERATURE HIGH PRESSURE WARNING ►The projector uses a high-pressure mercury glass lamp. The lamp can break with a loud bang, or burn out, if jolted or scratched, handled while hot, or worn over time. Note that each lamp has a different lifetime, and some may burst or burn out soon after you start using them.
The air filter has two kinds of filters inside. Please check and clean the air filter periodically. When the indicators or a message prompts you to clean the air filter, comply with it as soon as possible. If the filters are damaged or heavily soiled, replace them with the new ones. To prepare the new filters, make contact with your dealer and tell the following type number. Type number : UX37191 (Filter set) When you replace the lamp, please replace the air filter.
Preparing for the remote control Please insert the batteries into the remote control before using it. If the remote control starts to malfunction, try to replace the batteries. If you will not use the remote control for long period, remove the batteries from the remote control and store them in a safe place. 1 2 3 Holding the hook part of the battery cover, remove it. Align and insert the two AA batteries (HITACHI MAXELL, Part No.
This projector has internal clock that uses a battery. When the clock of the network function does not work correctly, please try solution by replacement of the battery: HITACHI MAXELL, part number CR2032 or CR2032H. Turn the projector off, and unplug the Battery Cover power cord. Allow the projector to cool sufficiently. After making sure that the projector has cooled adequately, slowly turn over the projector, so that the bottom is facing.
Caring for the mirror and lens If the projection mirror or lens is flawed, soiled or fogged, it could cause deterioration of display quality. Please take care of the mirror and lens, being cautious of handling. the projector off and unplug the power cord 1. Turn from the power outlet. And cool the projector down 2. by leaving it for a while as it is. The lens door can be opened manually. Please hold both side of the lens door and slowly open it until it is locked with clicking sound.
Using the CD manual System requirements The system for using the CD-ROM requires the following. Windows®: OS:Microsoft® Windows® 98, Windows® 98SE, Windows NT®4.0, Windows® Me, Windows® 2000/Windows® XP or later CPU:Pentium® processor 133MHz / Memory:32MB or more Macintosh®: OS:Mac OS® 10.2 or later CPU:PowerPC® / Memory:32MB or more CD-ROM drive: 4x CD-ROM drive Display: 256 color / 640x480 dots resolution Applications: Microsoft® Internet Explorer®4.0 and Adobe® Acrobat® Reader® 4.
Specifications Item Specification Product name Liquid crystal projector Liquid Crystal Panel 1,024,000 pixels (1280 horizontal x 800 vertical) Lamp 210W UHP Speaker 10W Power supply AC 100-120 V/3.1 A, AC 220-240 V/1.6 A Power consumption AC 100-120 V:310 W, AC 220-240 V:300 W Temperature range 5 ~ 35°C (Operating) (Except for the use the interactive function.) Size 345 (W) x 102 (H) x 303 (D) mm * Not including protruding parts. Please refer to the following figure. Weight (mass) approx. 4.
If an abnormal operation (such as smoke, strange odor or excessive sound) should occur, stop using the projector immediately. If a problem occurs with the projector, refer to “Troubleshooting” of “Operating Guide”, “Network Guide” or other related manuals, followed by performing the suggested checks. If this does not resolve the problem, please consult your dealer or service company. They will tell you what warranty condition is applied.
Appendix: Pen operation Items F-1 F-2 • On a horizontal surface • Mounted on the wall or ceiling b1 b2 a c2 c1 a c1 c2 b2 b1 T-1 Projection distance Screen size (diagonal) a type(inch) 60 70 80 90 100 b1 Screen height b2 c1 c2 m m inch m inch m inch m inch 1.5 1.8 2.0 2.3 2.5 0.120 0.188 0.256 0.324 0.392 4.7 7.4 10.1 12.8 15.4 0.426 0.494 0.562 0.631 0.699 16.8 19.5 22.1 24.8 27.5 0.295 0.332 0.369 0.407 0.444 11.6 13.1 14.5 16.0 17.5 1.102 1.274 1.446 1.618 1.791 43.
F-3 Access point Computer Cb/Pb Cr/Pr USB TYPE B COMPUTER IN2 HDMI COMPUTER IN1 AUDIO OUT L R DISPLAY USB TYPE A DC5V 0.
F-5 Computer Access point LAN USB TYPE B COMPUTER IN2 HDMI RS-232C COMPUTER IN1 USB TYPE A DC5V 0.5A LAN MIC AUDIO IN1 AUDIO IN3 AUDIO OUT CONTROL MONITOR OUT R R L L S-VIDEO VIDEO AUDIO IN2 F-6 Computer USB (A) USB TYPE B DISPLAY COMPUTER IN2 HDMI COMPUTER IN1 USB TYPE A DC5V 0.
308 303 F-7 124 192 345 132 72 102 130 [unit: mm] 4 25
DUKANE CORP AV SERVICE DEPT 2900 Dukane Drive St Charles, IL 60174 800-676-2487 / 630-762-4032 Fax 630-584-5156 avservice@dukane.com www.dukane.