
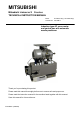
Instruction manual

- 1 -
1 Contents ······························································································································································· 1
2 Safety Instructions················································································································································ 2
3 Points of Caution ·················································································································································· 3
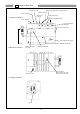
4 Names of Each Part ············································································································································· 4
5 Installation ···························································································································································· 5
1. Installation of the motor ·················································································································································5
2. Installation of the control box·········································································································································5
3. Installation of the pulley·················································································································································5
4. Mounting of the belt·······················································································································································5
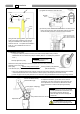
5. Installation of the protective cover·································································································································6
6. Installation of the position detector································································································································7
7. Connection of the Mitsubishi sewing machine and control box·····················································································7
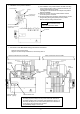
6 Wire and Grounding ············································································································································· 8
1. Insertion of the power connector ···································································································································8
2. Connection of 3-phase power ·······································································································································8
3. Current capacity ····························································································································································8
4. When using the 3-phase 200 - 240V class Limiservo X with single phase 200 - 240V class ·······································8
7 Confirmation························································································································································· 9
1. Before turning switches on.......... ··································································································································9
2. Turn on the power..........················································································································································9
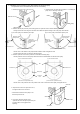
8 Adjustments························································································································································· 10
1. Adjustment of stopping position····································································································································10
2. Adjustment of pedal toe down pressure, and heeling pressure····················································································10
3. Adjustment of operation speed·····································································································································11
9 Changing the solenoid voltage and output voltage······························································································ 12
1. To change solenoid voltage DC24V/DC30V·················································································································12
2. Changing the output voltage between 0VDC and 5VDC······························································································12
10 Operation of the Control switch Panel Keys ······································································································ 13
1. Displays during normal mode and functions of each key ·····························································································13
2. Selection of each mode················································································································································13
(1) Types of program mode ····································································································································13
(2) Selection of each program mode from the normal mode.·················································································14
(3) Direct number call function································································································································15
3. Using the normal mode ················································································································································16
4. Changing to the tacking, preset, pattern NO. selection mode······················································································17
(1) Tacking setting mode ········································································································································17
(2) No. of tacking stitches setting mode ·················································································································17
(3) Preset stitching setting mode····························································································································18
(4) Pattern No. selection mode·······························································································································18
5. Using the program mode [1] simple setting··················································································································19
6. Using the program mode [2] simple setting··················································································································21
7. Using the program mode [3] simple setting··················································································································23
11 Example of setting the program mode··············································································································· 25
1. To change the maximum speed····································································································································25
2. To set the standing work type·······································································································································25
3. To operate Half-stitch operation with a backstitching switch ························································································26
4. Outputting puller output to spare output 02 ··················································································································26
5. Setting the number of stitches to the UP position stop after fabric end is detected with optical sensor, etc. ···············27
6. To continue presser foot lifting after the thread trimming, and to bring down the presser foot after the time
set on the timer has passed··········································································································································28
7. When after trimming thread while sewing thick fabric, needle is stuck and fabric cannot be removed························28
8. To display the rotation speed on the operation panel···································································································29
9. To adjust the tacking accurately ···································································································································30
10. Setting the tacking stitch correction····························································································································31
11. Example of setting counter function····························································································································32
12. To check the error code history and input/output signal ·····························································································33
13. To return all settings to the factory settings ················································································································35
14. To adjust the position data for the lever unit···············································································································36
12 To save the setting data····································································································································· 37
13 Function List ······················································································································································ 38
14 How to Use the Option Connector····················································································································· 42
1. Connector Layout ·························································································································································42
2. To use as a standing work type sewing machine ·········································································································43
15 Error Display······················································································································································ 44
16 Specifications ···················································································································································· 45
<Reference> Table of digital display··················································································································· 45
Dimensions (MOTOR and CONTROL BOX)······················································································· 46
1 Contents