
User`s guide

DataBase
Maps
71
Maps
can be imported into the system for alarm annunciation, Input, Output, and Camera Control.
Many different graphic file formats can be imported into the system. Once imported into the system
the Map is saved as a .bmp file at it’s original size. The General Tab is where the graphic alarm maps
are imported into the system. The I/O Points Tab is where the desired Inputs, Outputs, Cameras, and
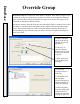
Override Groups
are placed on the Map.
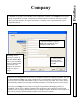
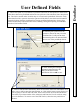
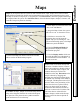
1. Select Maps from the main menu and
Click on the Add Button.
2. Assign the Map a Name the system
will refer to it as. 30 characters or less.
3. Click here to access the File
navigation box used to locate the
graphic map you are looking for. The
system automatically opens to the Maps
subdirectory under WinDSX.
4. Enter the Width and Height the
Map should be displayed as in the
Workstation program.
5. Enter the Display Order which sets
the order the Map Icon is displayed in
the Workstation Control Window. 1 is
the first in the list.
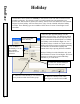
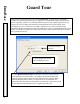
Double Click on Override Groups and
I/O Points. Double Click the Location
Name, then continue to Double Click to
show all available inputs, outputs, and
cameras that may be selected for
inclusion on the map. Placement on the
map is achieved by dragging and
dropping the selected item from the list
on the left onto the Map in the Window
on the right. The Map then turns to full
screen to allow exact positioning of the
Icon. Once the Icon is placed exactly
where you desire click on the Map
somewhere other than the location of
the Icon to return to the I/O Points Tab.
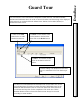
The Icons that are selected for the
Inputs, Outputs, and Override Groups
are the same Icons that are placed on
the Map.
To remove
an Input, Output or Override Group from a
Map, select the point from the list to the left and press
the space bar. This places the not symbol around the
point and removes it from the map.
6. Click on the Map Icon field to choose an Icon that
will be used in the Workstation program.