
Installation Guide


Installation
5
□
1
FF
B
A
EE
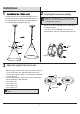
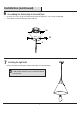
Conrm that the holes on the shade (B) align with the holes on
the xture body (A). Pass mounting screws (EE) through holes of
the shade (B) and holes on the xture body (A) and thread into
the mounting ball (FF). Hand-tighten until snug.
3
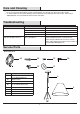
Adjust the length of the xture wire
□
□
NOTE: Do not cut the xture wire. This will be done in
step 4.
Adjust the length of the xture wire. With a screw driver, remove the
screw to open the wire clasp. Adjust the length of xture wire to
achieve your desired xture height. Secure the wire by reinstalling the
screw into wire clasp.
Recommended xture wire length, from the canopy to xture body,
when mounting above a 30 in. high table:
8 foot ceiling – 31 in.
9 foot ceiling – 43 in.
10 foot ceiling – 55 in.
11 foot ceiling – 67 in.
Installing the crossbar assembly
2
□
□
AA
BB
Remove the crossbar assembly (AA) from the ceiling canopy
on the xture body (A).
Secure the crossbar assembly (AA) to the outlet box (not
included) with the outlet box screws (BB). Tighten until snug.
NOTE: Prior to installation, close or cover the sink drain
and/or any vents near the installation site to prevent loss of
mounting hardware if dropped.
Outlet box
Screw
Wire clasp
Fixture wire