
Installation Guide


Installation
5
□
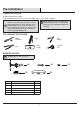
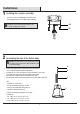
Installing the crossbar assembly
AA
BB
1
Secure the crossbar assembly (AA) to the outlet box (not
included) with outlet box screws (BB). Tighten until snug.
NOTE: The preassembled mounting nipple on the
crossbar should protrude outward.
□
□
□
□
□
□
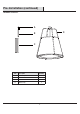
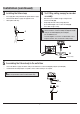
Assembling the rods to the xture body
2
Remove wires labels from the supply wires and the ground wire.
Choose desired hanging length for the light xture.
Assemble the necessary rods using the 6 inch rod(s) and/or 12 inch rod(s).
Pass supply wires and ground wires through the rod assembly.
Attach the rod assembly to xture. Hand- tighten until snug.
Then thread the xture loop (A) to the uppermost rod. Hand- tighten until snug.
Hint:
- Assemble one rod at a time.
- Pass the ground wire through the rod rst.
- Then, pass the supply wire through the rod.
- Thread the rod by hand until snug.
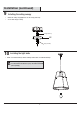
Suggested rod length to hang xture 30 in. above
an island top:
- 8 ft. ceiling (1) 6 in. rod + (1) 12 in. rod
- 9 ft. ceiling (1) 6 in. rod + (2) 12 in. rods
- 10 ft. ceiling (1) 6 in. rod + (3) 12 in. rods
NOTE: Please pay attention to the polarity (wires labels
L & N) when remove wires labels. Wire identication will
be needed in STEP 8.
A
B
C
D