
Instructions / Assembly


□
□
3
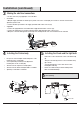
Making the electrical connections
Installation (continued)
6
* Use wire connectors (CC) (supplied) to connect the wires.
Ground Wire:
1. Wrap the supply ground wire around the green ground screw on the crossbar (AA), no less than 2 in. from the end of the wire.
Tighten the ground screw.
2. Connect the xture ground wire to the supply ground wire with a wire connector (CC).
Supply Wire:
1. Connect the supply white wire to the white xture supply wire with a wire connector (CC).
2. Connect the supply black (or red) wire to the black xture supply wire with a wire connector (CC).
3. Wrap each connection with approved electrical tape and carefully stuff all of the connected wires into the outlet box.
AA
CC
Green Ground Screw
□
□
□
□
5
NOTE: use 3 x 100W medium base bulbs or LED equivalent.
(sold separately)
B
A
Installing the Shade and the light bulb
Remove the socket collar from the socket on the xture body
(A).
Then place the shade (B) over the socket on the xture body
(A) as shown.
Secure by threading the socket collar onto the socket.
Hand-tighten until snug.
Install correct bulb referring to xture markings and/or
labels for maximum wattage.
socket collar
Installing the Fixture body
□
□
□
□
□
4
Line up holes on the backplate and mounting holes on the
folded edge of the crossbar (AA).
Secure by threading mounting screws (DD) into the
mounting holes on the crossbar (AA).
Thread screws into top rst. Do not fully tighten.
Thread screws into bottom and tighten with a screwdriver.
Tighten top screws with a screwdriver.
DD
DD
AA