
Instructions / Assembly


Installation
5
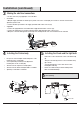
Installing the Crossbar Assembly
1
□
□
□
AA
BB
Remove the crossbar (AA) from the backplate on the xture body (A).
Align the crossbar (AA) to the outlet box so that the mounting holes on the crossbar (AA) are on the top and bottom.
Secure the crossbar (AA) to the outlet box (not included) with outlet box screws (BB).
NOTE: Prior to installation, close or cover the sink drain and/or any vents near the
installation site to prevent loss of mounting hardware if dropped.
Outlet box
Installing the Lanyard
2
□
□
□
□
The lanyard is provided as a means to support the xture from the junction box while connecting the electrical wires. This enables
the xture to hang from the junction box and your hands are free to make the wire connections.
Turn the button stop so it may be inserted into the crossbar slot. Make sure the button stop is completely inside the crossbar.
Slowly release the xture to make sure it is supported by the button stop.
Proceed to Step 6. Once wiring is complete, the lanyard will push into the junction box when the Ceiling Canopy is Attached to the
ceiling.
Lanyard
Slot