
Owner's Manual


Safe Sticks
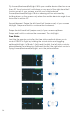
Just like the remote controller, the safe sticks method allows you to
control DBUS1’s flight by tapping on the arrows on the four directions in
the virtual sticks.The operations of the safe sticks method are similar to
the free sticks method. However, it uses tapping on the arrows on the
four directions instead of toggling. For the details, please refer to “Free
Sticks Method” on page 30.
• The default mode is set to single shot. You can tap the “Camera
Settings” button to switch between the single shot mode and the burst
shot mode, and select how many photos to DBUS1 (3 photos by default)
in the “Modes” menu. Please refer to “Camera Settings” on page 17.
• The photo timer is off by default. You can tap the “Photo Timer”
button to activate the photo timer and select the countdown. Please refer
to “Photo Timer” on page 17.
Electronic Image Stabilization
Electronic Image Stabilization (EIS) can reduce or eliminate shakiness,
jitter, etc. It applies to both the conventional video recording and the
Single shot: In the single shot mode, every time you tap the
“Shutter” button, it will take one photo.
Burst shot: In the burst shot mode, every time you tap the
“Shutter” button, it will take a series of burst shot photos.
You can take photos by using the volume buttons on your mobile device
or earphones, just as you would using the “Shutter” button.
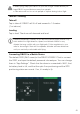
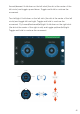
Hold down on any part of the left side of the screen, and the left stick will
follow to the point where you hold down; so it is for the right stick.
After choosing “Safe sticks”, you can choose between “Mode 1”
(left-hand throttle) and “Mode 2” (right-hand throttle).
Taking Photos / Recording
Video
Taking Photos
26