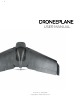
DRONEEPLANE USER MANUAL Revision 2 / May 2018 Copyright © 2018 Dronee Ltd
DRONEEPLANE User’s Manual TABLE OF CONTENTS Package includes Quick Overview 1. Hardware 1.0 Plane 1.1 HUB 1.2 Batteries 1.3 Charger 2. Software 2.0 Install Dronee App 2.1 Get familiar with User Interface ▪ 2.1.0 Control tab ▪ 2.1.1 Mission Tab ▪ 2.1.2 Settings tab ▫ 2.1.2 a) CONTROL settings ▫ 2.1.2 b) SURVEY settings 3. Flying Your Drone 3.1 Check weather 3.2 Place camera 3.3 Planning a mission 3.4 Preparing drone for a mission 3.5 Execute a drone mission 4. Maintaining Your Drone 4.
Package includes
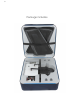
The standard DroneePLANE package contains the following items: • • • • • • • • • • • • • • Carrying case with foam protection 1 x DroneePLANE central body with built-in autopilot 1 x pair of detachable wings 2 x spare propellers 5 x spare propeller attachment rubber bands 2 x Lithium-Ion battery packs 1 x Elastic band 1 x Airspeed cover 1 x battery charger (including cables and adapter) 1 x HUB (ground radio station) 1 x USB cable for interfacing with camera and on-board autopilot 1 x Camera with batter
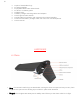
• • • • • • • • • • 1 x pair of detachable wings 2 x spare propellers 2 x propeller attachment rubber bands 2 x Lithium-Ion battery packs 1 x Elastic band 1 x battery charger (including cables and adapter) 1 x HUB (ground radio station) 1 x USB cable for interfacing with camera and on-board autopilot 1 x Camera with battery, charger, cable, SD-card, user manual (Optional) 1 x User Manual HARDWARE 1.0 Plane o Wing: The DroneePLANE wings are detachable, making the drone compact and easy to carry.
o Ailerons: These are used to control the DroneePLANE while in flight. o Aileron control mechanism: this mechanism connects ailerons with servomotors within the central body of the DroneePLANE. o Propeller: generates thrust while it is in flight. Caution: When the propeller is attached to the motor, it spins at high speeds and can be potentially dangerous. Be careful to always keep your hands clear of the propeller when the battery is attached to the DroneePLANE. Using safety gloves is recommended.
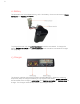
1.2 Battery The DroneePLANE is equipped with a 3 cell Li-ion battery. It has two connectors, Power Connector and Balance connector. To power the drone, only the power connector should be connected. To charge the battery Balance connector and power connector, both should be connected to charger. See page 123 1.
SOFTWARE DroneeCOCKPIT is the integrated software package that allows you to interact with your drone. Its easy-to-use interface allows you to plan a surveying flight intuitively from the tablet directly in the field. Once the drone is launched, you can track its position, monitor the progress of your mapping flight and send commands if desired. 2.0 Dronee APP installation Dronee app is compatible with iPad air 2 and with higher versions, and doesn't require any additional hardware to attach to tablet.
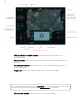
Pic 2.0 CONTROL tab o Attitude Indicator on artificial horizon: Shows orientation of the drone to the horizontal horizon. o Altitude Indicator: Shows drone altitude above take-off location (not altitude from sea level). o Ground Speed Indicator: Shows the drone’s current speed relative to ground , in meters per second. o Target Lock: Locks drone target altitude on semi-autonomous flight. In the lower left and lower right of your CONTROL tab screen, note two joysticks.
o Joystick Gyro: A small button next to the top of “Pitch and Yaw Joystick” joystick activates the gyro in the iPad, and allows you to manipulate the plane by moving your iPad up and down, left and right. Hold the iPad in your hands to manipulate it, and press your thumb on the joystick. Removing your thumb deactivates the joystick. o Throttle: The joystick on the left of your screen is the throttle control, and allows you to increase or decrease the plane’s altitude.
Pic 2.1 MISSION TAB On the upper left of the MISSION tab you will see two circular indicators. Total Distance: this indicator indicates the total distance of the mission. Estimated Time: this indicator shows the estimated total mission time. Just below the two circular indicators are four more indicators. These show Takeoff, Mission01, Mission02 (if there is one) and Land. You can change the order of missions by tapping with your finger.
hold a finger on the map. A shaded circle will appear inside the red circle (Figure c). This shaded circle shows four icons in order from the left, they are Mission, Survey, Land and Loiter. When you press any of these icons, the shaded circle will vanish from the screen, and you will use the function, confirming it with a second tap, and the shaded circle will reappear First, tap SURVEY-> A survey pattern will pop up on the iPad screen.
Next, tap LAND -> A symbol will appear. Move the landing symbol to the point you wish the drone to land. Tap the symbol and a circular indicator pops up. The drone symbol appears at the edge of the indicator circle. Move the drone symbol around the indicator circle periphery to set the angle of approach for the landing.
appear on the left of the screen. You will now have four labels appearing below “Slide to Takeoff”. They will be Takeoff, Survey01, Survey02 and Land. Save the mission => you just click the Save button (lower left corner). It is now saved in the Archive, and can be accessed by clicking the Archive button. Clear the mission => on the screen by clicking Clear. It’s a good idea to use a logical system to name your missions, because you may accumulate a number of them in the Archive.
2.1.2 a) CONTROL settings The Control settings is for semi-autonomous flight. In the center of this screen you can set the altitude for the takeoff point and set the altitude for the mission. 2.1.2 b) SURVEY settings The Survey tab sets the parameters for the camera and the survey. Appearing in the center of this screen is a vertical menu range of functions. Camera has a database of cameras, scroll down and select the camera you are using for the mission. Select it and it will connect with WIFI.
Resolution: adjusts the resolution you want to get. three slides adjusts the quality of survey you want to get. Overlap, Side-lap and Buffer. Overlap is the degree of overlap between passes of the survey. The more overlap there is, the more readily software can match images, resulting higher quality images, but overlap reduces the area the drone can survey in a single flight. Front-lap is the overlap between images taken in flight direction of the drone.
Geotagging tags GPS coordinates of photos inside camera. This button need to be pressed after drone lands. The line at the bottom shows the altitude during the survey and the frequency of images taken by the camera. 2.1.2 c) GEOFENCE settings The Geofence tab sets the parameters for the geofence area. Geofence prevents the drone to fly to unwanted areas. Recommended to use geofence settings according to your country regulations Geofence: Turns on/off the geofence feature.
3 Flying Your Drone 3.0 Charge batteries Before every flight make sure that battery fully charged. To charge battery follow instruction on section 4.0. 3.1 Local Conditions and Weather Check DroneePLANE is a small drone and its performance can be affected by high wind, high temperatures, and rain. It is recommended that you check predicted weather conditions before flying the drone, including wind predictions for the flight area. Note that wind is often stronger at higher altitudes.
Power up the drone by connecting the battery. Wait for one full minute while the plane automatically calibrates itself. Fasten the compartment cover. Note the two knobs on the top of each wing, close to the central body. These are used to fasten a special elastic band from each wing across the compartment cover, so that the band lends support to the wings and assists in keeping the compartment closed. Your drone is now physically ready for its mission. Now connect to Dronee WIFI network on iPad.
When you add Mission to the map, you will see on the flight trees appear on the left side. You can add multiple survey areas, delete areas from Mission Tree, or change the order of missions. 3.4 Execute a drone mission After setting up your mission on the tablet, you simply slide “Slide to Take-Off” and the mission will be loaded into the drone. The Drone control surfaces (elevons) will lift. This means the drone is ready for take-off. Gently lift the drone up, grasping each wing’s leading edge.
Caution: Avoid bringing the Drone Plane into direct contact with water, as this may damage the electronics within the drone airframe. And keep your drone in dry environment 4.3 Full airframe and sensor inspection Beyond the general airframe inspection that should be performed before every flight, we recommend that you perform a full airframe and sensor inspection regularly to keep your drone in good operating condition.
4.5 Maintaining Drone Condition To maintain DroneePLANE at peak operating efficiency, several simple maintenance tasks should be performed regularly. After you have disassembled the drone, use a soft dry cloth to make sure that all parts of the drone are clean and dry. Then return it to the carrying case, Before the drone is returned to the carrying container, check for dents and other conditions that might have resulted from rough landings or encounters with tree branches.
-Poor GPS signal: if the drone icon on app is blinking, or doesn't get solid, that means poor GPS coverage. You can wait for better conditions for satellite signal reception. Alternatively, move away from objects that may disturb satellite signals such as cellular antennas. 5.1 Physical problems: -WIFI connection faulty: if you cannot see “Dronee” WIFI on tablet or tablet doesn’t connect “Dronee” WIFI. Turn off the HUB, and after 5 seconds turn it on again. If the problem persists, contact Dronee.