
Use and Care Guide


Eco-65 Installation and Operation Manual
19
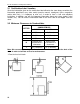
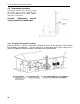
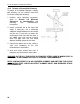
4.5.3 Through Roof Installation
1. Position stove following clearances given
in Section 3.2: Minimum Clearances
to Combustibles and following vent
manufacturer’s instructions.
2. Install a cleanout tee to the stove flue
outlet. If necessary, use a horizontal
additional length between the flue
outlet and the tee. If you wish to center
the vertical part of the vent with the
stove, a 45° elbow and a tee can be
used to route the pipe from the flue
outlet towards the back center of the
stove.
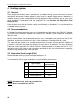
3. Drop the plumb bob over the center of
the tee outlet and mark location on the
ceiling. Install the ceiling support and
the vent pipe by following the vent
manufacturer’s instructions.
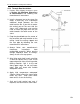
4. Always follow vent manufacturer’s
clearances instructions from
combustible materials. When passing
through additional floors or ceilings,
always install a fire stop spacer.
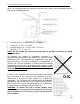
5. After lining up for hole in roof, cut either
a round or square hole in roof. Install
upper edge and sides of flashing under
roofing materials. Nail it to the roof
along upper edge. Do not nail lower
edge. Seal nail heads with flexible
waterproof sealant.
6. Apply high temperature waterproof
silicone sealant where the storm collar
meets the vent. Slide storm collar
down until it sits on the flashing.
7. Seal and install vertical roof vent. If
required, seal and install a storm collar.