
User Manual


Drobo 5C User Guide 22
1.2.1 Inserting the Drives
As a first step to set up your Drobo 5C, insert the drives into your device. For more
information on drive requirements, see Selecting Drives.
Also, see this link on the Drobo website: http://www.drobo.com/storage-
products/choose-drive/.
Warning:
Any pre-existing data on the drives will be erased, as the drives will be formatted.
If you wish to keep the data, copy it to another drive or medium before using with
your Drobo 5C.
Notes:
Once you insert the drives into your Drobo 5C, they function as a unit or “pack.”
To access the data on them, you will need the entire pack.
The Drobo 5C supports migrating entire disk packs from a Drobo/Drobo S,
preserving its data. To ensure a safe and successful migration of the drives, carefully
follow the instructions in Migrating a Disk Pack from Another Drobo Device.
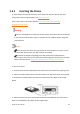
To insert the drives
1. Remove the front bezel (faceplate) from the front of your Drobo 5C by pulling it off.
2. With one hand, hold the drive so that the label on the top of the drive faces up (and
its connectors are positioned at the device and toward the left). Refer to the image
below.
3. With your other hand, use your thumb to depress and hold open one of the drive
locks to a selected drive bay. Refer to the image below.