
User Manual


Drobo 5C User Guide
110
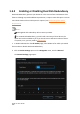
1.6.2 Adding Capacity (or Drives)
When you find your Drobo 5C is running low on space, you can easily add capacity by
either replacing a smaller capacity drive with a larger one, or by inserting a new drive in
an empty drive bay of your Drobo device. Note that once you add the new drive, it
becomes part of the overall storage pool, with all drives functioning as a unit or “pack.”
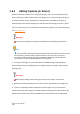
You can use drives from any manufacturer and with any capacity. For more information,
see Selecting Drives.
Warning:
Any pre-existing data on the drives you add will be erased during installation.
Tip:
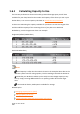
In the event that your Drobo device becomes nearly full and all the drives are the
same capacity, you will need to replace two drives, one at a time, in order to
increase the overall amount of protected capacity. Replacing one drive will not
increase your overall protected capacity in this situation.
1. Ensure the drive lights on your Drobo device are not blinking yellow and green,
which indicates that your Drobo device is working to protect your data. Wait until the
blinking stops.
Warning:
Removing or adding a drive during this process may result in loss of data.
2. Remove the bezel (faceplate) from the front of your Drobo device by pulling it off.
3. If you are replacing a smaller capacity drive with a larger one, first remove the
smaller capacity drive by using your thumb to depress (and open) the drive lock for the
data bay that contains the drive you would like to remove. Refer to the image below.