
User Guide


Drobo 5C Getting Started Guide 9
2: Setting Up Drobo 5C
Once you have unpacked your Drobo 5C device from its box and ensured that you meet all the
operating system and hardware requirements, it is time to set up your device for use. You also need
to upgrade the firmware to the latest version before using the Drobo 5C device, as the device
shipped out will not have the latest firmware.
Note:
- The Drobo 5C device will not be usable until you have upgraded the firmware.
You can perform the setup of Drobo 5C in few steps by:
1. Inserting the drives to your Drobo 5C
2. Connecting USB and power cables
3. Installing the Drobo Dashboard on your computer
4. Turning on the power and updating your Drobo 5C with the latest firmware
5. Registering your Drobo 5C
6. Formatting the drives
If you need to assess that the setup process is moving smoothly, see Guide to meaning of indicator
lights (LEDs).
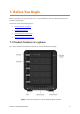
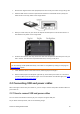
2.1 Inserting drives
With the Drobo 5C in powered off state, insert the drives you plan to use in the device. For more
information on drive requirements, see Selecting Drives. Also see this link on the Drobo website:
http://www.drobo.com/storage-products/choose-drive/.
Warning:
Any pre-existing data on the drives will be erased, as the drives will be formatted. If you wish to keep
the data, copy it to another drive or medium before using with your Drobo 5C.
Note:
Once you insert the drives into your Drobo 5C, they function as a unit or “pack.” To access the data on
them, you will need the entire pack.
2.1.1 How to insert the drives
To insert the drives to your Drobo 5C device: