
User Guide


Drobo 5C Getting Started Guide 10
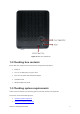
1. Remove the magnetic front bezel (faceplate) from the front of your Drobo 5C by pulling it off.
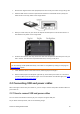
2. Hold the HDD with its connectors positioned at the device and toward the left (usually the
labels will be on the top). Refer to the images below.
3. With your other hand, use your thumb to depress and hold open one of the drive locks to a
selected drive bay. Refer to the image below.
4. Slide the drive into the drive bay, release the drive lock and push the drive into place until you
feel it connect. The drive lock snaps behind the drive, securing it into place.
Note:
If you are inserting an SSD (Solid State Drive), ensure that it is compatible by visiting our web page on
compatible drive options.
5. Insert additional drives in the same manner, following steps 2 through 4.
6. When finished, replace the faceplate right side up, so that when your Drobo 5C is turned on
you will be able to see the indicator lights. For more information on Indicator lights, see Guide
to meaning of indicator lights (LEDs).
2.2 Connecting USB and power cables
After inserting the drives into your Drobo 5C, you are ready to connect the power and data cables on
your Drobo 5C.
2.2.1 How to connect USB and power cables
You can connect the Drobo 5C directly to your computer using the USB port.
As you follow the steps below, refer to the following image.