
Instruction manual


21
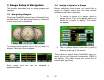
3 Gauge Setup & Navigation
This section describes how to setup gauges and
navigate.
3.1
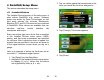
Navigating Gauges:
To access DashDAQ gauges, tap on [Gauges] from
the Main Menu. The last gauge layout you selected
or this screen will be displayed.
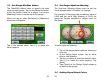
To change gauge layouts, tap on the [<<] and [>>]
buttons. Here are a few examples:
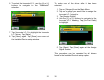
Every gauge and box can be assigned a
parameter/signal.
22
3.2
Assign a Signal to a Gauge
Before specifying what signal you would like a
gauge to display, make sure the New Vehicle
procedure has been completed.
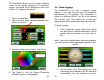
1. To assign a signal to a gauge, select a
gauge screen. Tap on the gauge where you
would like a signal to display. This screen
will appear:
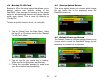
2. Tap on [Assign Signal]. Notice the [<] and [>]
buttons at the top of the screen.
These allow to switch which DashDAQ input you
would like to use (Optional Accessories). OBDII is
the default. Pick which signal you would like to
monitor and tap [Save].