
User manual


R699831 - Dreamy Geek User Manual
SeLeCtIng an audIo/VIdeo SourCe
16
(Internet Service Provider) that your connection is working. If you don’t have Ethernet plugs in your house, your
ISP would generally lend a modem used to log to the internet network. The modem has rooter capabilities and
Ethernet plugs that can be used to connect the Dreamy Geek to the internet.
Automatic or Fixed IP Address
The default setting is DHCP and it lets the rooter decides which IP is assigned to the Dreamy Geek. That means
that the IP address of this unit is not xed and may change after a reboot. Therefore, the access to this unit will
use the authentication name on the network.
If you plan to connect to your projector using programs that require a xed IP, you should set manually the
Network settings in the menu: Home Screen > Settings > Net and Location Settings > Wire Settings >Manual.
Make sure to use a valid IP address and to set the same subnet set as dened by the rooter network settings.
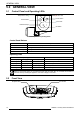
9.0 SELECTING AN AUDIO/VIDEO SOURCE
9.1 Select a Video Input from the Main Screen
• Turn the projector ON and wait until the menu appears on the screen.
• Check that your source is connected to a valid input (HDMI 1, HDMI 2, Video (RCA) or VGA/PC)
• Switch ON the source Blu-ray, DVD player, game console, etc.
• Go to the main page screen of the projector by pressing the “Home” button and launch the “Source” App to
select the active input.
Source App
Go to the main page by pressing the Home button
and launch the Source App by selecting the “Source” icon.
• `The current selected input is highlighted in yellow. If a “No Signal” warning is shown, make sure that your
source is correctly connected and is powered ON.
Select the correct input, the input selected is colored yellow.
If no signal is detected, a “No Signal” message shall appear.