
User manual


gettIng Started
R699831 - Dreamy Geek User Manual 13
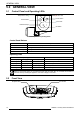
5.3 Rear View
VGA/PC input HDMI 1 input
Audio input (R/L)
Video input (RCA)
Micro-SD slot
HDMI 2 input
Power input
Audio out (jack)
Rear view and input panel.
• Inputs: connect your video source to the correct input between HDMI 1, HDMI 2, Video (RCA) or VGA/PC.
• Power input: connect the power cord as shown in the next chapter.
5.4 Side View
USB 1 slot
USB 3 slot
USB 2 slot
Air intake
Ethernet (RJ-45)
Loudspeakers
Side view and multimedia input slots.
• Multimedia inputs: insert USB devices or a Micro-SD card to read their A/V content.
6.0 GETTING STARTED
6.1 Connecting the Power Cord
• Before plugging in the Power Cord, ensure that all devices have been connected to
their respective inputs of this unit.
• Connect the power cord to the power input terminal of the projector.
CAUTION AGAINST FIRE AND ELECTRIC SHOCK.
Since the power consumption of this unit is high, insert the power plug directly into a wall outlet. Do not
use a power voltage different from that which is indicated. Do not cut, tear or modify the power cords.
Also, do not place a heavy object on, heat or stretch the power cords as this may cause damage to the
cords.