
Operation Manual


Vigor2926 Series User’s Guide
67
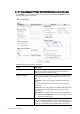
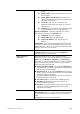
Detect – Click it to detect a suitable MTU value
Accept – After clicking it, the detected value will be
displayed in the field of MTU.
PPP/MP Setup PPP Authentication – Select PAP only or PAP or CHAP for
PPP.
Idle Timeout – Set the timeout for breaking down the
Internet after passing through the time without any action.
IP Assignment (IPCP) - Usually ISP dynamically assigns IP
address to you each time you connect to it and request. In
some case, your ISP provides service to always assign you the
same IP address whenever you request. In this case, you can
fill in this IP address in the Fixed IP field. Please contact your
ISP before you want to use this function.
Fixed IP – Click Yes to use this function and type in a fixed IP
address in the box of Fixed IP Address.
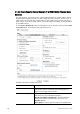
WAN IP Alias - If you have multiple public IP addresses and
would like to utilize them on the WAN interface, please use
WAN IP Alias. You can set up to 32 public IP addresses other
than the current one you are using. Type the additional WAN
IP address and check the Enable box. Then click OK to exit
the dialog.
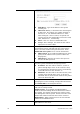
Dial-Out Schedule Index (1-15) in Schedule Setup - You can type in four sets of
time schedule for your request. All the schedules can be set
previously in Application >> Schedule web page and you can
use the number that you have set in that web page.
TTL Change the TTL value – Enable or disable the TTL (Time to
Live) for a packet transmitted through Vigor router.
If enabled - TTL value will be reduced (-1) when it
passess through Vigor router. It will cause the client,
accessing Internet through Vigor router, be blocked by
certain ISP when TTL value becomes “0”.
If disabled – TTL value will not be reduced. Then, when
a packet passes through Vigor router, it will not be
cancelled. That is, the client who sends out the packet
will not be blocked by ISP.
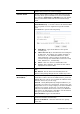
Default MAC Address – You can use Default MAC Address or
specify another MAC address by typing on the boxes of MAC
Address for the router.
Specify a MAC Address – Type the MAC address for the router
manually.
After finishing all the settings here, please click OK to activate them.